News:

Welcome to the Tormek Community. If you previously registered for the discussion board but had not made any posts, your membership may have been purged. Secure your membership in this community by joining in the conversations.
www.tormek.com

Main Menu
Menu

Show posts

This section allows you to view all posts made by this member. Note that you can only see posts made in areas you currently have access to.

Show posts Menu

Topics - Jan

#1
Knife Sharpening / Chart for kenjig dimensions
May 13, 2020, 08:44:45 PM
My favourite angle setting tool for kitchen knives is kenjig with projection distance 139 mm. My standard bevel angle is 15 dps. The attached chart shows in red the change in distance from the grindstone to the top of the USB for the whole lifespan of the grindstone. It starts at a distance 78.9 mm for 250 mm diameter and ends at a distance 89.3 mm for a fully worn grindstone (180 mm).

My standard deburring procedure consist of honing at the leather honing wheel at an angle 16.5 dps. The chart shows in blue that for leather honing wheel LA-220 with 215 mm diameter the distance from the wheel to the top of the USB is 85.7 mm.

Because my computer is situated two floors above my shop this chart reduces my movement on the stairs between the basement and the second floor.

Jan

#2
Some two months ago I purchased smaller belt grinder (2 x 50") mainly for knife making but with some optional accessories it can be used for knife sharpening using Tormek jigs.

The belt grinder has three phase 2 HP Siemens motor and variable frequency drive speed controller which allows to select RPMs between 800 and 3600. It also allows to reverse the motor revolutions. This is important because I sharpen away from the edge at 800 RPM.

For sharpening using Tormek jigs I ordered contact wheel with 250 mm diameter and a special attachment with horizontal support bar. There is no need for FVB.

There exist plenty of various grinding belts suitable for knife sharpening. New belts are very aggressive and very small pressure is sufficient to sharpen the edge.

The major concern is dust and heat generation. I have attached the grinder to a shop vacuum cleaner but I rely more on a filtering mask. What heat generation concerns, when using belts with 400 grid and finer, I do not feel temperature increase with my fingers.

The angle setting is the same as on Tormek. The kenjig concept works fine because the wheel diameter is fixed.

You can imagine that it is a pleasure to have this alternative to Tormek machine with a limited number or grinding stones.

Jan
#3
Scissors Sharpening / Re-riveting old moustache scissors
December 11, 2019, 05:11:59 PM
Recently I was sharpening old moustache scissors. The factual value of the scissors is quite low but the emotional value is high because it was used by my father and grandfather.
The blades had large play and wobbled. Rivet tightening did not solve the problem and so I decided to replace the rivet.

After de-riveting it was easier to mount the very narrow blades in the Tormek scissors jig and sharpen them.

Steel rivets with suitable cylindrical heads are not available in a hardware store and so I was forced to make my own rivet. But how to do it without a mini lathe? I used metric bolt M3, mounted it into my Proxxon grinder and gently touched the grindstone of the bench grinder. See the picture. After three attempts the bolt head was reduced to a suitable size. After tightly riveting the scissors work fine again.

Jan
#4
Knife Sharpening / Antique straight razor
June 28, 2019, 09:58:35 AM
Recently I received torso of an antique German straight razor. The razor was completely destroyed, whole pieces of the bevel were broken off the blade. I decided to reshape the razor torso into a letter knife. Because the carbon steel is really hard I used fine diamond wheel.

Jan
#5
My prototype of a self-centering knife jig for Tormek was inspired by the knife clamp for Lansky controlled-angle system. See the thread Clamp of the week at https://forum.tormek.com/index.php?topic=3792.0
The original Lansky knife clamp is not fully suitable for the use on Tormek USB, because it is of subtle construction and clamp width is 1" only.

I used similar design, but made the clamp from robust steel brackets of 4 mm = 0.16" thickness and 40 mm = 1.6" width. My jig, similarly to Tormek knife jig, has an adjusting screw (M6) and a tightening knob, also M6. The edges of the jaws are tapered at an angle of 15⁰. Between the jaws they are two pairs of guiding pins. The length of the clamp is circa 120 mm ≈ 4.8".

My jig has no adjustable stop, the edge angle is set with the Microadjust on the Universal support.

The major advantage, compared with the Tormek knife jig, is its self-centering property. The jig is able to accommodate quite thick blades and even cleavers.  You can also symmetrically mount blades which are tapering from spine to the edge.

For the time being I am collecting experience how the jig behaves during sharpening of the tip, using lifting and pivoting. Based on my first tests, the jig behavior is not so different from the standard Tormek knife jig as I was expecting.

Jan

P.S.: Some holes in the clamp were inherited from its bracket past and have no function now.  ;)
#6
As already discussed here the water trough has to be emptied and cleaned regularly. The residuum cannot be put down to the sink because it would cause plumbing problems.

For this reason I was glad to find a usage for the water with grinding grit.

Sometimes ago I was asked to make a ritual knife with a stone handle. It was necessary to drill a 1/3" hole into the stone handle. I used the wet grinding grit worn from a SG stone as a cutting fluid and it worked fine.


Jan
#7
Recently I was asked to sharpen three ancient plane irons. The most challenging one was the round, almost semi-circular, blade. I guess it was for an ancient moulding plane.

I mounted the round blade into the scissors jig and quite successfully replicated the existing cutting edge. Near the apex it was quite easy, but both shoulders required small reshaping.

The small change in the edge angle from the apex to both sides of the blade probably could be explained by the wedge shape of the blade clamp. My apex edge angle was some 35°.

The reshaping was done on the SG stone graded coarse, sharpening on SG graded fine. Keeping the iron in the jig I moved to the honing wheel set to the same edge angle as the grinding wheel.

Jan
#8
Knife Sharpening / Scandi grind - mystery revealed
January 23, 2017, 05:26:50 PM
Last year on the margins of some microscopy thread we have discussed why some outdoor knives with scandi grind have unusually small edge (included) angles.  :-\  http://tormek.com/forum/index.php?topic=3190.15

Scandi grind is defined as a flat grind and is often intended for sharpening on a flat stone in an outdoor environment. The attached pictures show a blade of a new Swedish Morakniv made of stainless steel hardened to HRC 56-58. The length of the scandi grind is 6 mm and the edge (included) angle is 22 to 23°.

Using a microscope with magnification 50X I have revealed tiny micro-bevel of less than 0.1 mm length. In the second picture the micro-bevel is depicted as the upper horizontal white belt which is not intersected by the vertical scratches.  I was interested in the edge angle of this micro-bevel and so I have used my laser goniometer to measure it. But it was in vain because such a tiny micro-bevel has not reflected enough laser light. So I have thought to focus the laser beam using a watchmaker's loupe. And suddenly I have revealed a very weak reflection indicating that the edge angle of the micro-bevel is circa 36°.

As already mentioned by Grepper in the previous discussion the purist will say that it is not a really scandi grind but for me it is more important to know that the cutting edge angle is not 22° but realistic 36°.  :)

Jan
#9
Knife Sharpening / Knife jig à la T2
January 15, 2017, 08:55:33 PM
Since I saw the T2 knife jig I was wondering how well this approach works.   :-\

To test it I have prepared a simplified jig shown in the attached pictures. The jig consists of an aluminium L bracket attached to the tool rest. To get the necessary clearance above the USB the bracket is mounted on 3 plastic plates of total thickness 25 mm.

The picture shows setting for a bevel angle of 15°. The angle was set using the Anglemaster.

Because I have not found suitable clip I test it without it, keeping the side of the blade aligned with the bracket.

When the sides of the knife are parallel, the edge is straight and the stone is true than the sharpened bevel has an acceptable quality. If the steel is not too hard some three passes maybe sufficient to get the burr.  :)

For blades of a more complex shape my preliminary results are less satisfactory. It is not easy to sharpen consistent bevel along the belly or at the knife tip. It may be caused by the absence of the blade clip.  ;)

Jan
#10
Tormek Drill Bit Sharpening Attachment DBS-22 remains on my wish list while the dull bits fill my drawer. So I have decided to make a simple jig for drill bit sharpening. As you surely know they are dozens videos on web concerning twist drill bit sharpening.

In the attached picture you can see that my drill bit jig consists of a pertinax plate which slides on the scissors jig base. An aluminium L profile is used as a guidance for drill bit orientation. The guidance profile shown in the picture is for the most common drill bit point angle of 118°. The lip clearance angle is set by tilting the base. I have used a lip clearance angle of 10°.

Originally I have planned to sharpen the drill bits with the basic cone geometry, where the two cutting lips meet and form a chisel edge. When I have learned this basic approach, I began to think about whether this simple drill bit jig would enable to ground 4-facet point also.  :-\

It turned out that with careful work it is well possible. First I have ground the primary facets using a clearance angle of 10°. Than I have tilted the base by another 10° and ground the secondary facets. So the clearance angle of the secondary facets is 20°.

I have tested the re-shaped drill bit in iron and can confirm that the 4-facet geometry works well. At first glance it is obvious that it performs better than a drill bit with the basic cone geometry and chisel edge.  :)

Jan
#11
Knife Sharpening / Sharpening Fissler Chef's Knife
December 10, 2016, 05:34:52 PM
Recently I was sharpening an all-purpose Fissler Perfection Chef's Knife, 8 inches long. What I found interesting was that the composition of the steel was engraved on the blade. The other interesting feature was that its tang, running through the entire length of the handle, is elegantly twisted by 90-degree. The transition between the bolster and the handle is perfectly smooth with no cracks or edges.

I was sharpening the blade to an edge angle of 36° using the knife jig. Because the convex blade slightly tappers towards the edge it was necessary to correct the angle setting after turning the jig upside down. Two revolutions of the adjustable stop were necessary. The reason for the angle asymmetry was the wedge shaped blade which was not symmetrically mounted into the knife jig.  ;)

This knife made in Germany is elegant, it would be nice to have it in the kitchen, but the price is (for me) pretty high.  :)

Jan
#12
The knife concaving problem was discussed in many forum topics, e.g. in Wootz's "Middle overgrinding problem". http://forum.tormek.com/index.php?topic=3055.msg16442#msg16442

The general recommendation how to avoid a hollow spot on the blade curve comes from Stig: "Use less time and pressure in the middle of the blade".

Wootz provided detailed analysis and recommendations concerning timing and pressure when pulling the blade across the grindstone.

Since I read about the concaving issue and also concaved my knife, I was wondering what is the time deficit at the heel and at the tip of the blade compared to the time spent at the straight part of the blade. 

In the attached drawing, there is a graph showing how much time we spend grinding one centimeter segment of a 15 cm (6") long blade. I have assumed that we move the knife slowly, with uniform velocity of 1 cm/s over the stone from the heel to the tip.

The simplified graph shows that the largest deficit is at the heel. At a distance 5 cm (2") from the heel the blade already receives full grinding time (5 s per 1 cm segment). This is true for all distances up to 13 cm from the heel. The last 2 cm of the blade near the tip are deficit again, because I assumed that we stop the pass 2 cm before the stone edge.

The grinding time deficit near the heel and near the tip should be compensated by spending additional time and/or applying additional pressure here. The graph is in compliance with the quoted guidance and also with relevant Wootz's recommendations.  :)

Jan 
#13
Knife Sharpening / Regrinding Victorinox knife
August 24, 2016, 04:20:31 PM
As I have already mentioned I measured the edge angle of my quite new 6" long Victorinox knife (6.8003.15) with my laser goniometer and got circa 20°. I was wondering about it and asked Victorinox for possible explanation but received only a formal answer.  :(

So I decided to reground the knife to an edge angle of 30°. I tried to do it with utmost care. I set the angle using kenjig concept to avoid blade tappering. Because the knife was flexible I mounted it into the Long knife jig. Because the spine thickness was only 1.4 mm I used a 0.55 mm thick shim to symmetrize the blade position in the knife jig (Wootz recommendation).

I have reground the knife away from the edge (Steve recommendation) for longer exit burr. The SG stone graded fine was not able to remove the steel in reasonable time so I regraded it coarse, removed the steel and graded it fine again.

I have decided for jigged honing on the lather wheel to avoid edge rounding. To minimize the knife handle colliding with the grindstone I used a Wootz-type adapter to elevate the bar of the USB.

At the end I measured bevel angles with my laser goniometer again. The results are following:
bevel angle on the right site = 14.5°,
bevel angle on the left site = 15.5°.

I would be happier with 15° for both sides but the 0.5° is an accuracy level and even more the edge angle is 30°.  :)

That's the story of how I was regrinding my new Victorinox knife. 

Jan
#14
Some time ago Wootz posted reference to the study "Experiments on Knife Sharpening" by John Verhoeven. In the appendix 1 there is a sketch of a laser device for edge angle determination.  https://www.wickededgeusa.com/wp-content/uploads/2012/10/knifeshexps.pdf)

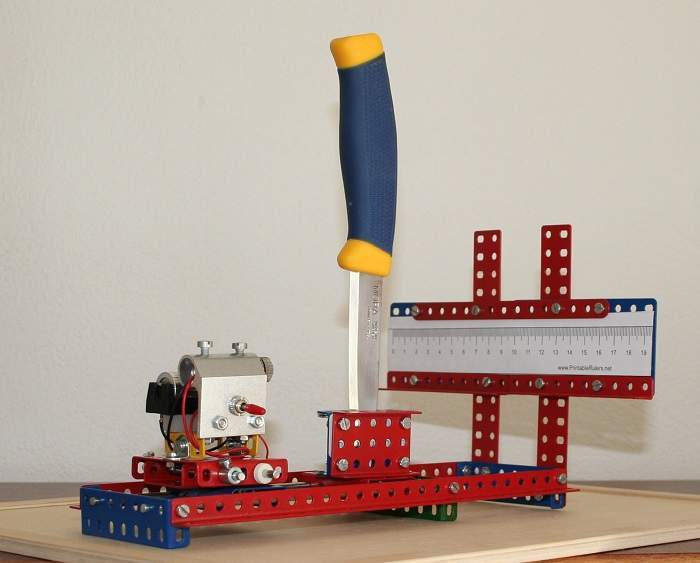
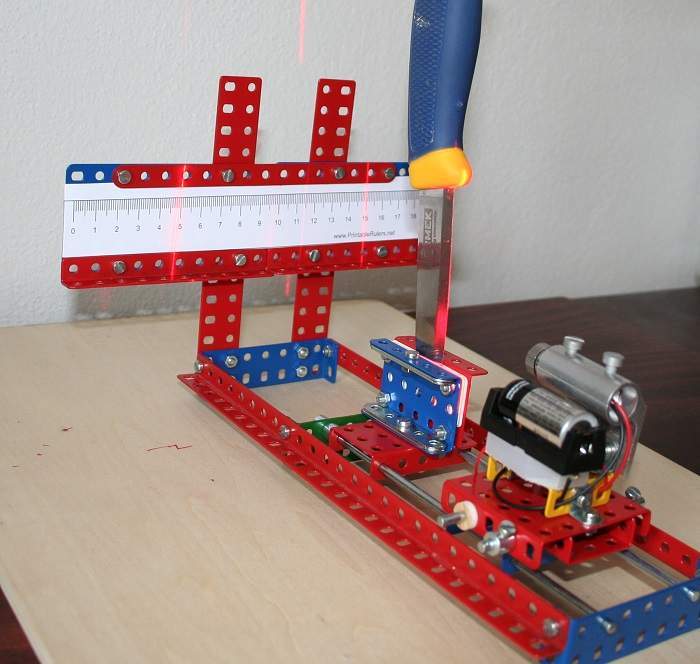
I was wondering if it will work with the laser line module which I am utilizing for LOC visualization. Using children mechanical construction set I prepared simple optical bench shown below.


As I expected it works fine for knives with wide bevels which reflect the laser beam well (e.g. the TORMEK/MORA knife shown). The laser line is splitted and reflected on the knife edge. The reflected rays draw two lines on the cross board. From the separation of those lines and the distance of the cross board from the edge the edge angle can be easily calculated.


Much less satisfying results I have obtained for my quite new Victorinox kitchen knife where the bevel is narrow (less than 1 mm) and does not have mirror quality finish. With some difficulties I was able to determine the angle of the blade tapering. The lines reflected from the tapered sides were heavily blurred. In my thinking the reason may be that Victorinox side grind is not exactly flat but slightly convex. The estimated angle of the approximately "V" grind was circa 3o.
The reflections from the own bevel were very weak, even in a darkened room, and even more indicating an edge angle of 20o instead of 30o.

So those are my provisional results, I still have to work on that.

Jan
#15
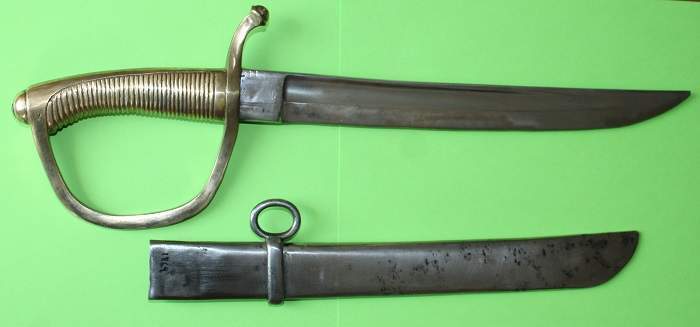
Recently I was asked if I could repair broken tip of an old stabbing weapon shown in the picture below.  :)


The history of this weapon is interesting. It was originally probably gendarmerie saber used in Austrian-Hungarian Monarchy in the second half of the 19 century. When the owner died and the family had not the necessary license, the saber was officially broken. From the broken part a shorter stabbing weapon was made. This is especially well visible on the shortened sabretache. The total length now is 40 cm (16") only.

Jan
#16
Knife Sharpening / Just out of curiosity
June 25, 2016, 02:59:32 PM
The standard way to grind knives is towards the edge with the USB placed vertically. In some situations it may be advantageous to grind away from the edge with the USB placed horizontally.

Just out of curiosity I have tried to grind away from the edge with the USB in the vertical sleeves.  ;)


To gain some clearance for sharpener's fingers I replaced the vertical sleeves locking screws with the ones from the horizontal base, because those are shorter.

Important: If the USB and knife jig setting remains the same for both towards the edge and away from the edge sharpening, than the edge angle is the same for both sharpening directions.

Jan

P.S.: For long knives a collision between jig knob and USB leg can occur.

#17
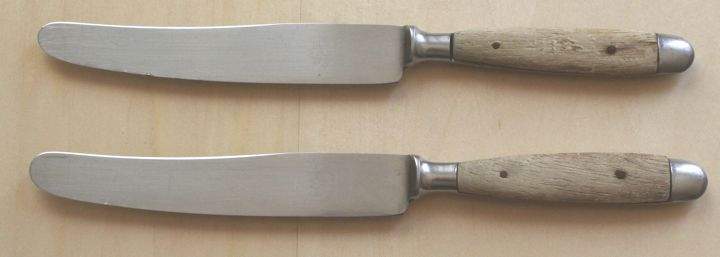
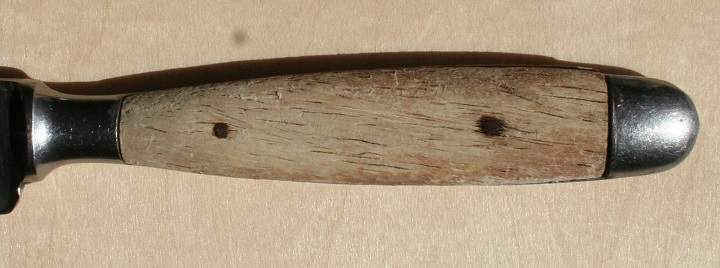
I have received for re-handling two ancient Solingen table knives. Both knives are frequently used, mainly as spreading knives. I can make the new knife handle of beech, oak or ash wood. Can anyone advise me what would be the best material for the handle scales which are only some 3 or 4 mm thick?


I cannot determine the type of the original wood. The blade is made of stainless steel but the rivets not.


I intend to glue and pin the handle scales to the blade.  For the finish I plan to boil the handle 3 hours in linseed oil and then use beeswax and cotton polishing wheel.

Jan
#18
Today, for the first time, I was notified about the new Tormek square jig and the updated gouge jig. The notification was given from Tormek AB info@tormek.se to the email address that I put on my T7 purchase order. Thank you, Tormek.  :)

As already discussed here, I think it would be a good service for forum members. 

Jan


#19
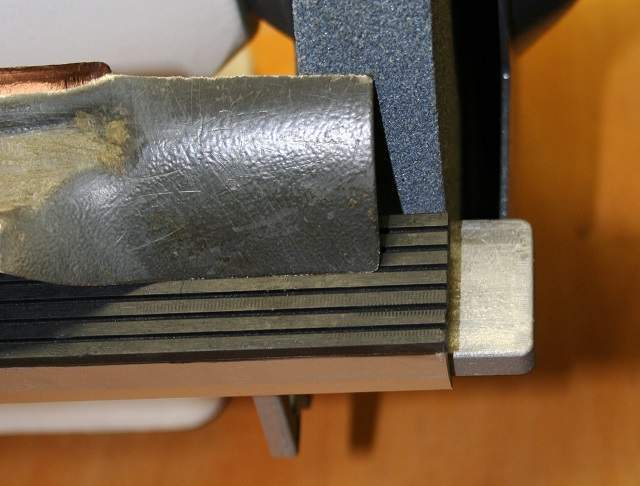
For shaping and sharpening lawn mower blades I usually use the bench grinder, but sometimes I am not fully satisfied with free hand grinded edge angle consistency.  :(

Recently it occurred to me to lay a rubber-faced vise jaw pad on the bench grinder tool rest.  The vise jaw protector can slide along the bench grinder tool rest while keeping the edge angle of the blade the same. The mower blade rests in a groove of the rubber-faced pad. Using the same groove it is easy to get the same edge angle for both ends of the lawn mower blade.  ;)


Jan
#20
General Tormek Questions / Special Christmas present
December 19, 2015, 07:50:25 PM
Last year I received from colleagues, who are aware of my sharpening hobby, a special ancient tool as a Christmas present.  :)


The donor told me that it's a farrier's chisel used to form hooves of horses.
The chisel cannot be sharpen on TORMEK because it is too narrow (less than 40 mm, some 1 1/2").

May be similar tools were used also in colonial America. In Europe farriers are known until today from the Household Cavalry of the British Army.

Jan