News:

Welcome to the Tormek Community. If you previously registered for the discussion board but had not made any posts, your membership may have been purged. Secure your membership in this community by joining in the conversations.
www.tormek.com

Main Menu
Menu

Show posts

This section allows you to view all posts made by this member. Note that you can only see posts made in areas you currently have access to.

Show posts Menu

Topics - kwakster

#1
Years ago i modified this Spyderco Endura ZDP-189 from a saber/flat ground to a saber/hollow ground knife with the help of my trusted Tormek T7 fitted with an SB-250 Black Silicon stone & a modified knife clamp.
Previously the knife looked like this (with an already Tormek reprofiled edge angle of ~25 degrees inclusive)


Afterwards the knife looked like this.
Although the edge angle was only marginally thinned to ~22,5 degrees inclusive, the area just behind the edge is much thinner now at ~0.3 mm, making the the knife cut better noticeably.


The job took about 2 hours of grinding (with the SB-250 stone graded to coarse with the help of the TT-50 diamond stone grader), as ZDP-189 in it's hardened state (64-65 HRC on this model) is quite some wear resistant stuff.
To grade it back to fine (for normal sharpening) i use a large diamond stone, as the standard SP-250 grading stone is completely useless on the silicon carbide stone.
For this project i ran my SB-250 in a trough completely filled with a Windex clone to avoid glazing the surface during grinding & sharpening.

The knife is on a more or less permanent loan with a friend of mine who works as a process operator in a baby milk plant, where part of his job is cutting open huge plastic bags (with glued cardboard top layer and about the size of a small room) containing milk powder.
The wear & tear resistant plastic plus the industrial type of cardboard in those bags ruin edges in no-time, and so far this reground ZDP-189 Endura lasts the longest from all the knives used in the plant, also because of those serrations which enable him to get the job done when the plain edge part gets too dull.
#2
Strider DB in 3V steel.
This is a limited edition of the DB model in CPM-3V steel and made from thinner stock than the usual S30V versions.
Originally it looked like this:


The straight edge was reprofiled on a Wicked Edge sharpener to 30 degrees inclusive & polished up to 6 micron 3M diamond paste, while the slanted edge was done on a Tormek T7 to 45 degrees inclusive & polished up to 15 micron 3M diamond paste.
Both edges will treetop armhair, the straight edge will also whittle hair in some places.
Now this DB can and will cut, and it still can be used as a sharpened prybar in an emergency.


Some close-ups:


Difference between 15 micron and 6 micron;

#3
Knife Sharpening / Cletus Spuckler on knife sharpening
February 02, 2026, 05:14:43 PM
Cletus is a cook and that's what he does.

The clip showcases the amazing things one can do to a knife edge with a pull-through "sharpener".

https://www.youtube.com/watch?v=UMBD1Hhgdzo

Maybe i should sell my Tormek and buy one of these ?
#4
My most recent find is this Wade & Butcher "Boone" carbon steel hunting knife.
It was discovered together with several other vintage hunting knives in an old leather hunting bag from the 1930's somewhere in Amsterdam.
The steel has gotten a dark grey patina from being stored inside the sheath for decennia.

On the blade the letters "ILLWELL" are very faintly visible, and through Google i found that originally it spelled "GILLWELL", which is the 144 acre sight North of London given to the Scouts in 1919 and now the worlds historical site for scouts.
It seems that the change from "GILLWELL" to "GILWELL" took place when Baden Powell was made the first Baron Baden-Powell of Gilwell in 1929.
So in 1919, when the first Wood Badge course was held, it was Gillwell Park.

If the info from Google is correct that would date my knife to have been manufactured between 1919 and 1929, although the sheath is probably not original to the knife but most likely from Scandinavian origin.


#5
Sometimes i buy used older knives to restore, but also as practice material to try out certain idea's.

The tanto point on this used & worn 1980's Cold Steel Shinobu folder was made a bit pointier with the help of my Tormek T7, then sharpened & polished on a first generation Wicked Edge.
The straight edge was done freehand on Paper Wheels with diamond compounds.
The rubber grips were also re-attached to the liners (as they had partially come loose)

How these knives look from the factory (pics from the net):


How my knife looks now:


A test i sometimes do just for the heck of it is to see how far from the point of holding one of my chest hairs can still be whittled root-to-tip (reverse hair-whittling) while holding the hair at the root end only.
The edge on this modified Cold Steel folder could do it at around 1.18 inch (about 3.0 cm)
Now i don't own a BESS tester, so i have no idea where this would be on their scale.


#6
Vintage XL sawback scout knife manufactured by the no longer existing Solingen based firm of Kronenkrebs.
The stag handle was way too thick for my hands, and the low sabergrind geometry was far from ideal for it's intended use as a large allround camp knife / chopper.
The quality of the drop-forged steel in the blade however makes it worthwile for me to put in some elbow grease.
This is how the knife looked when i bought it:


First i ground the old "edge" flat on the Tormek SB-250 stone, then ground down the blade's center ridges on both sides with a Chinese 120 grit diamond file, then reshaped the blade from a low sabergrind into a full convex one with the help of a somewhat modified cheap Parkside linisher that can now also be used as a slack belt grinder.

This is the machine i have:

https://www.youtube.com/watch?v=sHvbVhnNuAU

Refining the blade surfaces as well as the actual forming & refining of the apex area was done by hand on grits 240 and 400 wet & dry paper using WD40 as a lubricant, while the burr was removed on the Tormek leather wheel.
The new apex can whittle a chest hair from hair root to hair tip @ about 30 degrees inclusive.
The grinding & sanding of the blade also automatically resharpened the sawback's teeth, and the full convex blade shape makes that the sawback is now the blade's thickest part, which reduces the chances of jamming when using it for sawing or notching.

The slack belt linisher also proved very useful for shaping a new handle made from 12 thick rubber washers, each one cut from an old piece of very wear resistant & triple fiber weave reinforced industrial conveyor belt.
The ground & shaped rubber has a very nice tactile feel to it and i suspect that it will also dampen shock quite effectively, which will aid it's use in it's intended role.
Also made a thick aluminium guard as a replacement for the factory installed useless piece of flimsy brass.
Guard & pommel are now permanently installed using 2-ton epoxy, while each rubber washer is glued to the next with a good rubber glue which stays flexible.

The knife is now ready for some field testing, and if that turns out satisfactory some more refining steps will follow.
This is how it currently looks (sheath has been waxed but still needs to be restitched):


Specs:

Overall length: 33,5 cm (13.9 inch)
Blade length: 21,0 cm (8.27 inch)
Max blade thickness: 5,7 mm
Steel type: drop-forged low alloy carbon steel
Handle materials: Aluminium guard & pommel with rubber washers
Weight: 388 grams
Sheath: leather
#7
Vintage XXL Fahrtenmesser/Scout knife manufactured by Kienel & Piel in Solingen, Germany.
In Germany knives this size were often used by hunters for clearing shooting stands etc, but basically by anyone in need of a good quality heavy chopper with a classic design.

Once used in the jungles of Suriname by Dutch soldiers of Third Suriname Company in the early 1960's, this knife was recently found sheathed in an attic during a house clearing after the owner had passed away.
It's blade was corroded black, somewhere in time it had been "sharpened" on a bench grinder, and all handle parts were loosened and dried out.
But as the blade was still structurally sound and i have a soft spot for vintage German knives it became another project.

How i received the knife:


I chose to regrind the originally saber ground blade to convex by hand using a Chinese 300 grit diamond file, which removed most of the corrosion & edge damage, while at the same time giving the knife a much more effective blade geometry for chopping.
Also did a few refining steps using waterproof SiC paper on a semi-hard rubber backing with WD40 as a lubricant, but just enough so i can do a bit of test chopping when time permits.
The new edge measures somewhere between 25 and 30 degrees inclusive, and i still have to remove the burr.
The original stag handle was way too thick & lumpy for my hand, so after glueing all parts together i gave it a bit more ergonomic & functional shape.
Especially the thinning of the handle just behind the guard while leaving a thicker midsection makes for a very comfortable hold with much less hand fatigue.

Hand reground blade with handle disassembeld:


How it currently looks:


Specs:

Overall length: 17.4 inches (44,2 cm)
Blade length: 12.3 inches (31,3 cm)
Blade thickness: 4,0 mm
Steel: hot drop-forged carbon steel
Weight: 476 grams
#8
A few years ago a member of Tactical Forum in Germany sent me this vintage Puma 8101 Texas Bill, advertized in a 1950's Puma brochure as a "throwing Scout knife" (German: Wurf und  Fahrtenmesser)
The request was to give the knife some TLC, post some pics how i do things, and then return the knife to it's owner.


#9
Knife Sharpening / Knife restoration - Marble's Woodcraft
December 14, 2025, 02:28:33 PM
Restoration projects like these can be very rewarding, as not only do you get to bring pieces of knife history back to life, it's quite useful to practice your skills, plus it pays for itself as generally i use the proceeds of the sale of a restored knife to buy other oldies that could use some work.
This is an original Marble's Woodcraft fixed blade, probably from the 1930's.

In this case my Tormek T7 fitted with an SB-250 Blackstone (black silicon carbide) was only used in a supporting role: grinding the old edge flat to remove all of the old damage, so i could then hand regrind the blade back to it's original full convex shape.

Before:


After:


#10
A Swedish Erik Frost Mora knife, probably from the 1950's, with zero edge scandi grind carbon steel blade.
The leather sheath has a metal rim (painted red)

The knife was basically new & unused when i got it, but it had been sheathed for quite a few decades.
This is how it looked when i got it, and part of the edge still had a visible burr.

As found:


I renewed the edge on my Tormek T7 and gave the rest of the blade somewhat of a satin finish.
The fiber in the guard and below the butt had swollen a bit, so i sanded it flush with the brass and did some polishing.


Specs:

Overall length: 23,5 cm
Blade length: 12,1 cm
Blade thickness: 3,2 mm
Steel: Carbon steel
Handle material: Stag grip panels, brass & fiber guard, aluminium butt.
Weight: 140 grams
Sheath: Leather with red metal rim

#11
Posted on Fri Aug 26, 2022 on a few other forums.
---------------------------------------------

My nephews girlfriend is a hairdresser, and she asked me if i would try to sharpen her oldest pair of shears.
Years ago she had gotten it as a gift from her teacher, all this time had never been sharpened, and as a result it was so blunt that she didn't use it anymore.
Through Google i found that for 120 US dollars these shears seem to have a good price to quality ratio, so i thought that an attempt at sharpening might be worth it.

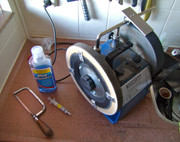
The edges were really quite bad, and as i had never done convex shears before i first had to think up a sharpening/polishing protocol that might work.
In the end i settled on 1000 grit SiC paper used with WD40 oil on glass, 15 micron diamond paste on the back of a narrow strip of SiC paper on glass, followed by 6 micron and 1 micron used the same way.
The hone line was repolished using only 1.0 micron diamond paste.

Just reassembled the shears again and the edges seem to work as they should, effortlessly cutting hair all the way to the point, but the real proof of the pudding is of course what the owner will think of it.
Will report back if i know more...


#12
Restoring older knives is one of my hobbies, and i think this one came out rather well.
No Tormek involved, all regrinding/sharpening was done by hand on a bench stone and refining on wet & dry paper.
The knife is a made in Sweden Pontus Holmberg first model survival knife for the Swedish Air Force, made between 1948 and 1952.

This is how the knife looked when i bought it:


And this is how the knife looks now.
Blade has been hand reground/reshaped to it's original full convex shape, and in the handle the rotted leather midsection was replaced with new leather.
Sheath was also hand restitched and waxed.


Full thread with pictures here:
https://www.bladeforums.com/threads/2-swedish-air-force-survival-knives.1776249/
#13
Knife Sharpening / Home made small knife rest for Tormek
February 06, 2025, 03:54:02 PM
Several years ago i made this small knife rest, a variant based on the original design by Tormek forum member Herman Trivilino.
Mine is being used for reprofiling/sharpening various blade shapes & sizes (flat ground is ideal, but saber ground is also possible), from the small blades in Victorinox knives up to expensive professional gyuto's with 210 mm blades.

A possible problem is that you would have to make such a knife rest yourself, as Tormek still doesn't offer something comparable.
I used a piece of Torlock cut from a Tormek SVD-110 tool rest (which remains functional afterwards btw), a few pieces of scrap aluminium & some metal screws.
A very important aspect is getting that piece of Torlock as square as possible, for which i used files and a micrometer.
With access to a precision milling machine it would be a piece of cake.

On top is a piece of 0.3 mm thin fiber-reinforced PTFE tape, which works very well for moving the blade across the platform and also to avoid scratches while doing that (up to a point)
For more blade protection i use plastic packing tape on the blade surface as well.

When used in conjunction with just enough water in the trough so that it doesn't splash the platform the tape lasts quite a while before i have to replace it with a new piece.
The lowest angle i can grind to is ~20 degrees inclusive.


Tormek SVD110 Tool Rest:

#14
Knife Sharpening / Forever SC-16WB ceramic knife
December 17, 2024, 03:35:58 PM
This thread was already posted on several knife forums about 10 years ago, and recently i got a message from a forum member from one of these forums that all pictures had become invisible, so i re-uploaded all of them, and this time also to a larger size.
Apparently people are still interested in older threads like this one, so i'm now posting the thread on this forum as well.

-------------------

Some time ago while surfing the net i found a website with Catra test results for 3 different ceramic knives: two by the well known Japanese Kyocera brand, and one from another (and unfamiliar to me) Japanese brand with the name Forever Company.
Next to various types of ceramic knives the company also seems to make a host of other specialty kitchen knives from various space-age materials: http://forever-k.com/en/ceramic/
Anyway, the 3 ceramic knives were tested on wear resistance, and the (much) cheaper Forever knife seemingly won by quite a margin regarding that aspect:

http://socialcompare.com/en/comparison/couteaux-en-ceramique-mpo3v9w

Now i know that wear resistance does not equal edge holding (especially with ceramic knives), but who knows ?
Maybe they're on to something.
Since i sharpen ceramic knives for others from time to time (and the two tested Kyocera models have always ranked the highest for me in the edge holding department so far), i became a bit curious about the Forever knife.
So i ordered the exact SC-16WB model that was tested from a Japan based E-Bay dealer for 45 US dollars including shipping to the Netherlands, and yesterday it arrived:


Specs:

Ceramic knife for right handed use (non-logo side is flat, while the logo side has a wide saber grind and a 70/30 edge
Overall length: 10.9 inch (27,6 cm)
Blade length: 6.3 inch (16,0 cm)
Blade material: High Density Zirconia
Blade thickness: 1,43 mm
Thickness behind the edge: 0,61 mm
Factory edge angle: 26/27 degrees inclusive
Edge finish: rather coarse with lots of bite (my estimate: somewhere around a 1000 grit)
Sharpness: Can shave my arm- and leg hair with the growth, not against it.
Not a single microchip can be felt using my nail, or seen through my Victorinox magnifying glass
Handle material: black plastic
Weight: 83 grams

I'm going to use the knife the coming months for standard kitchen duty, mostly to see how that rather coarse factory edge will hold up.
When the time comes i will experiment a bit with resharpening and write about my findings in this thread.
#15
A recent thrift shop find, and bought for a fart and three marbles (dutch expression, meaning for next to nothing)
From research i learned that J&R Dodge Sheffield didn't manufacture anything themselves, but instead bought high quality cutlery, razors and tools from well established Sheffield makers and resold these under their Juste Judicato (Choose Right) brand, for instance in two stores they owned in Amsterdam.
That is most likely how this carving knife ended up in the Netherlands.
Back in the day in this country J&R Dodge were known for the quality of the double-shear steel carving knives they offered for sale.


Specifications & measurements:

Overall length: 13.07 inch (33,2 cm)
Blade length: 8.07 inch (20,5 cm)
Blade thickness: 2,29 mm at the start of the swedge tapering to 0,44 mm at 1,0 cm before the point
Thickness behind the edge: 0.25 mm at the start of the swedge tapering to 0,16 mm at 1,0 cm before the point
Steel type: double shear steel
Handle material: black horn
Weight: 128,4 grams
The knife is handle heavy
#16
Knife Sharpening / Kohetsu HAP40 Santoku
December 15, 2024, 02:31:45 PM
Yesterday i received two of these Kohetsu HAP40 Santoku's from Chefknivestogo.com, a dependable US dealer for kitchen knives.
One of these will go to a Chef i know who has no experience ordering knives from abroad, and the other one will probably be sold to another Chef.


As often with Japanese knives the factory edges need some work to get them truly sharp, and these Kohetsu's were no exception.
One was just sharp enough to slice copypaper, the other reluctantly shaved a few hairs from my hand, and both of them had a few tiny burr remnants clinging to the apex.
Now both me and the new owner have zero experience with HAP40, so it will be a bit of a learning journey to finetune the edge into what works best & longest for him.


For it's first sharpening i chose to just leave the factory edge angle of between 17.5 & 20 degrees inclusive (!) intact and just resharpen the existing narrow V-bevel with 3 micron diamond compound on a Paper Wheel (with such a small edge angle this actually provides for an ever so tiny, but just visible burr), and deburr with 1 micron diamond compound on a second Paper Wheel.
With the naked eye it looks like nothing was done to the knife, but the new edge can whittle a chest hair towards the hair point and slice a paper towel clean.
Now we have to find out if the new owner can work with it, and what's especially important; for how long exactly before it needs resharpening.
My guess is that eventually he will settle upon a bit coarser edge, but we will see.


Specs:

Overall length: 29,5 cm
Blade length: 18,0 cm
Useful edge length: 17,4 cm
Blade thickness: max 2.06 mm
Steel: Laminated HAP40
Hardness: 65 HRC
Blade: double sided convex grind with half-sided convex bevel and a narrow V-bevel on top which forms the actual edge.
Edge angle: between 17,5 and 20 degrees inclusive (measured with Tormek WM200 Angle Master)
Handle material: Pakkawood
Weight: 170 grams
#17
Knife Sharpening / MDF strop with diamond compound
December 05, 2024, 09:33:04 AM
This type of strop is what i sometimes make & give to people who regularly bring me a CRK or other quality (Chef-) knife for sharpening and/or some TLC, so they can maintain & keep the appearance of their new edge themselves for some time.
Even a few professional Chefs in my area with expensive gyuto's and santoku's in modern PM steel types are using these same strops with good results, so they keep telling me anyway.
I use them myself as well, and they are easy to make.


What you see is a new & cut-to-size piece of clean MDF (medium density fiberboard) coated with a thin layer of 1.0 micron (~ 14000 grit) mono-diamond compound, and i put 4 self-adhesive rubber bumpers on the bottom.
These make the strop non-slip plus they elevate the working surface a bit more which makes the strop more convenient to use on a table (more room for your hands)
Due to the harder surface the chances of rounding your crisp apex are also greatly diminished when compared to stropping on compressible materials like leather.
The strop surface can also be cleaned from time to time with a microfiber cloth and some acetone, which will remove all or most of the swarf without removing the diamond particles, as these become (partially) embedded in the MDF surface during the stropping proces.


But this is (literally) the key element: the placement on rubber bumpers also provides the strop user with acoustic feedback by isolating the MDF from the table (a bit like the bars on a xylophone); you can actually hear when you're arriving at the very apex during stropping movements as the audible sound changes, which makes the stropping proces very easy, even for absolute beginners.


The CRK Nyala used as a prop for the pictures was reprofiled (from 35-40 degrees inclusive to an even 30 degrees inclusive) & sharpened (with 15 micron diamond compound on a Paper Wheel).
The owner only uses this quite expensive knife to cut oranges, about 5 each day, i kid you not.
#18
Knife Sharpening / A few ceramic knives
September 18, 2024, 08:04:45 PM
A small black ceramic backlock folder without any markings (Böker ?) i did in 2013.
This well made knife had practically no edge and no point to speak of when i received it, and even opening mail with it was difficult.
I used the Tormek SB-250 Blackstone graded with diamond to around 1000 grit for freehand reprofiling, followed by 3 Paper Wheels coated with 15, 6.0 and 3.0 micron diamond compounds for refining & polishing.
The new edge fits in the 30 degrees inclusive slot on my Tormek angle gauge, is slightly convex, and can shave the hair on my leg in both directions.


Specs:

Length open: 4.72 inches (12,0 cm)
Length closed: 2.76 inches (7,5 cm)
Blade material: black zirconium oxide
Blade length: 1.57 inches (4,5 cm)
Blade thickness: 2,0 mm
Handle material: Ivory Micarta & Nickel Silver bolsters
Weight: 61 grams
#19
This traditional Argentinian Ju-Ca brand fixed blade belongs to a friend of a friend, and as you can see the point was broken off and the handle was also in need of a bit of TLC.

Website of the Argentinian father & son team, who have been making these knives since 1959: http://ju-ca.com.ar/


#20
For quite a few years this Buck Strider 881 mini tanto in BG42 steel was gathering dust in a drawer, as to me it was more a knife-like object, literally unable to cut anything.
Over the last few weeks i changed that with the help of my Tormek SB-250 stone (for the point area), a 300 grit diamond file, a Foss 7205 black/green silicon carbide stone, and some 400 grit wet & dry SiC paper on glass (for the straight edge)
The apex on the now full convex blade measures somewhere between 22.5 and 25 degrees inclusive, and i'm first going to do some test cutting to find out if i can safely lower it a bit more.
Also rounded the overly sharp G10 grip plates a bit and sanded the screw heads.

Before:


While grinding the blade with the diamond file:


After the 400 grit SiC paper and removing the tiny burr on a piece of hard cardboard with a dab of 1.0 micron diamond paste:


Considering all work was done with only one eye currently functioning at about 80 % (plus a pair of reading glasses) i'm quite pleased with the result, :-)