
News:

Welcome to the Tormek Community. If you previously registered for the discussion board but had not made any posts, your membership may have been purged. Secure your membership in this community by joining in the conversations.
www.tormek.com

Main Menu
Menu

Show posts

This section allows you to view all posts made by this member. Note that you can only see posts made in areas you currently have access to.

Show posts Menu

Topics - Herman Trivilino

#21
General Tormek Questions / Table Saw Woes
March 25, 2013, 02:59:15 AM
Last night I was making another pair of the HK-50 jigs from that same piece of oak that I used the day before to make a pair.  I wanted to do it while I still had the table saw out as my shop does double duty as a garage and when both cars are in there the table saw is rolled off to the side, covered up, and used as a platform for my Tormek.  (I found a way to keep this post on topic!)  :)

Link to table saw literature: http://www.mikestools.com/download/DeltaTableSawManuals/34-670.pdf

I made a cut, then when I went to switch it on to make another cut there was nothing.  I checked that it was still plugged in to a powered source.  So, I flipped it over and checked the switches.  Both were good.  I hooked it back up and it worked.  So. I flipped it back upright.  Then it didn't work, then it did.  One time I had to give it a spin to get it started.  I noticed a lot of sparks flying out of the motor towards the blade.  So I took the blade off, blew compressed air into the motor housing, put a blade back in it and was able to finish up my work.  This morning I made the final cross cuts that turn the single piece into two jigs and finished them up.

I flipped the table saw over again, but this time onto a pair of saw horses so I wouldn't have to work on the floor.  I took the base off, and removed the motor.  I took the fan pulley housing off and removed the brushes.  I blew compressed air into the motor from both sides and also through the two holes where the brushes go.  Put the brushes back in and bench tested the motor.  No more sparks.  Blew some more compressed air into it while it was running.

Link to motor literature: http://www.ereplacementparts.com/delta-34670-type-inch-table-saw-parts-c-3275_3334_7069.html

I wanted to replace the brushes so I went searching in vain for them at Lowe's, Home Depot, and Sears Hardware.  I looked at photographs of the replacement brushes on the web and they don't look much longer than the ones I have. 

Link to brushes:  http://www.ereplacementparts.com/brush-sold-individually-p-57904.html

So, I used this opportunity to clean and lubricate all the linkages that adjust the blade height and miter angle, put it all back together and I think I'm good to go. 

Could it be the sparking was due to an accumulation of dust inside the motor?  Back in the day when I was a carpenter and doing trim work (2nd fix) the boss regularly cleaned his table saw motors by blowing compressed air into them while they were spinning.  It's not safe to do that to this saw unless you've got the saw upside down, so I never did it.  I did blow the dust out on occasion, but not while the motor's running. and not in recent memory.

#22
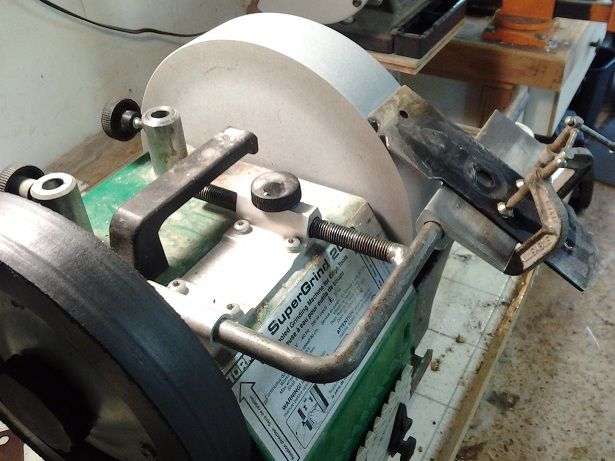
I've been working on this jig for a couple of weeks now.  The original thread is here:
http://forum.tormek.com/index.php?topic=1560.0

I'm starting a new thread in honor of the new name I've come up with for this jig.

I'm calling it the Homemade Knife Rest (HK-50).

This is a platform for supporting knife blades.  It sits atop, and is attached to, the base of the Tormek Scissors Jig (SVX-150).  The end of the platform nearly touches the grindstone so that the edges of knife blades of all sizes, from small pen knives to large machetes, can be ground.

#23
Does anyone know how to decipher the model numbers of the Tormek jigs?

For example,

SVM-45 Knife Jig,
SVX-150 Scissors Jig,
SVA-170 Axe Jig,
SVS-50 Multi Jig,
SVD-110 Tool Rest,
SE-76 Square Edge Jig (which I think replaced the now extinct SVH-60 Straight Edge Jig),
DBS-22 Drill Bit Sharpening Attachment.

It appears to have the format of  two or three letters, followed by a hyphen, followed by two or three numbers.

The first two letters are very often SV?  I don't have a guess for that, unless it translates to something in Swedish.
I would guess that in SVA the A is for axe.
And in DBS the DB is for drill bit.

#24
Anything unusual going to happen to the grindstone when grinding aluminum?  I expected it to go faster because the aluminum is so soft.  I'm thinking the aluminum particles are clogging up the grindstone.
#25
General Tormek Questions / DBS-22 vs Drill Doctor
March 19, 2013, 02:22:30 AM
I have the Drill Doctor XP and have had it for a couple of years or so.  I was confused about what they call "splitting the point" so I never bothered with it.  The talk around here lately about this homemade drill-sharpening jig, and the YouTube videos of that and of those sharpening them free hand, has caused me to take a second look.

I reviewed the videos of the DBS-22 and what Tormek refers to as its four-facet method.  Two primary facets are ground, which is roughly equivalent to the methods shown in the YouTube videos.

The issue with a bit sharpened in this way is that it walks.  It doesn't come to a sharp point and it leaves a chisel edge.  You need to punch a divot in the material first so the drill bit won't walk.  Also, it doesn't cut through the material as efficiently as it can.

The solution is what Tormek refers to as the secondary bevels.  The Drill Doctor documentation refers to this as "splitting the point".  I take it that these two techniques are similar in that they eliminate the chisel edge so that the bit doesn't walk, and they make the drill cut more efficiently.

It appears, though, that splitting the point with the Drill Doctor is a hit or miss thing.  You have to keep examining your work as you go to make sure you're grinding the same amount on each side of the bit, and that you grind to just the right depth.  If you don't grind enough you've still got a chisel edge, and if you grind too much you've oversplit the point and have to go back and remove some more of the tip.

It appears that the DBS-22 overcomes all these problems and makes the sharpening process more precise.

Am I on the right track here?

#26
Hand Tool Woodworking / Carver's Drawknife
March 17, 2013, 03:48:50 AM
Found an old carver's drawknife in a box of tools my Dad used to own.  It shows lots of evidence of repeated microbeveling.  The blade is 10" long and less than 3/4" wide.  There's no distinct blade, the metal bar has just been ground to a sharp edge on one side only.

The handles are perpendicular to the blade.  I did some searching and found that 25o is an angle recommended by one sharpener.  Does that sound right to you?

And here's a curious thing.  The round wooden handles have flat spots on the same side.  On the same side as the side you grind the bevel on.  The handles have lots of nicks and gouges, but the flat spots seem to have a bit fewer of them.  Same patina, though.  Anybody have a clue as to what that's all about?
#27
General Tormek Questions / Ionut's Small Knife Jig
March 10, 2013, 09:13:50 PM
Thanks to Ionut for his advice on how to make a jig for sharpening small knives.

You can see his original here:

http://forum.tormek.com/index.php?topic=1191.msg3308#msg3308

With a photograph here:

https://skydrive.live.com/?cid=bc168f3568163031&id=BC168F3568163031%21299&Bsrc=EMSHOO&Bpub=SN.Notifications&sff=1

So yesterday I decided to make my own ...


I made my platform out of an old lawn edger blade, and since I don't have the tool rest I used the base of the scissors jig.

#28
I know you all probably have the "newer" Universal Support with Micro Adjust (US-105).  It replaced the old universal support way back in 2003 I think, which was just a year after I bought my Tormek. 

A long time ago I bought a die and the matching nut for the 12 mm shaft.  The nut substitutes for the micro adjuster.  It never worked as well as I'd like it to so this weekend I made some further modifications.  I used bondo to cement the nut into a two-inch diameter plastic screw cap and fill in the gap between the outside of the nut and the inside of the cap.  After the bondo set up I drilled a hole in the middle of the plastic cap and screwed it over the universal support.

It worked just great except for one thing.  I could no longer tighten the set screw that holds the universal support in place because the cap diameter is too wide.  So, I went to the hardware store and bought a dimmer knob and a threaded shaft.  The shaft fits nicely into the dimmer knob, but I glued it in place anyway.  The shaft is longer than the one on the original set screw so I can tighten it up without it touching the new homemade micro adjust.

What can I say, I'm cheap.  But it does the job!

Edit: I later ordered a replacement part called the "7050 Tightening Screw - knife & scissor jigs".  I pulled the threaded shaft out of this part and swapped it out for the threaded shaft in the universal support tightening screw.  It's now long enough to work again.

#29
General Tormek Questions / Knife Sharpening
March 04, 2013, 02:03:29 AM
Knife sharpening has been the Tormek skill I've had to work hardest at.  Using the jig correctly takes practice, and free handing even more so.

Today I was able, for the first time ever, to get that really sharp razor edge I've been dreaming about.  I have an old six inch knife that my grandson bought at a yard sale about 10 years ago for probably $2.  He was just a child and wanted it because it had "Official Bowie Knife" stamped on the blade.  He was allowed to take ownership under the condition that it was to be stored in grandpa's tool drawer and  could be used only under adult supervision.

Today I decided to see how sharp I could get it.  I set the bevel angle as small as I could get it, probably abound 12 degrees (making for an edge angle of 24 degrees).  With the grindstone properly prepared to a smooth-as-glass finish I carefully ground the edge evenly all along one side.  Then I flipped it over and had to grind for a while before I reached the edge.  Again being careful to keep the bevel uniform along the length.  I then polished the bevel on the leather wheel to remove the burr.

I can easily slice quarter-inch wide strips of paper off the edge of a sheet held in midair.  I can also shave the hair on my arm.

I feel like I've reached sharpening heaven.

The key is the small edge angle.  I know the edge won't hold up but still I'm proud.

#30
General Tormek Questions / Cleavers
March 03, 2013, 08:39:35 PM
After my Dad passed away in 2005 I started setting some of the tools in his garage aside.  My Mom kept telling me to pick out what I wanted.  I ended up with a box full of old tools, mostly anything I saw that had an edge on it went into my collection.  Most of the edges had been damaged and showed evidence of attempts to fix them by grinding at ever more blunt angles.  And lots of mushrooming on the end of tools where it was designed to be struck by hammers.  Lots of interesting old tools in that box.  Every once in a while I'll pull a tool out of the box and try to rehabilitate it.

Yesterday I found an old rusty cleaver.  I cleaned it up and sharpened it, but I have no idea what the edge angle should be.  I guessed at 40 degrees (20 degree bevel angle on each side), which I figured would be a good sturdy edge.

Does anybody know what edge angle is appropriate for a cleaver?

http://s1291.beta.photobucket.com/user/htrivilino/media/cleaver_zpsf7fbe715.jpg.html?sort=3&o=0
#31
General Tormek Questions / Inspiration
March 02, 2013, 12:34:02 AM
All the new traffic on the forum, including the talk about reshaping bolsters or whatever those anatomical terms are for the knife parts, has inspired me to reshape some of my knives.

We have an assortment of paring knives and I just finished sharpening all of them.  I used the dry grinder on some of them to remove steel from various places and to straighten out some of the cutting edges.

Thanks everyone.

I was able to free hand and get some pretty nice edges on some really old and worn paring knives.
#32
General Tormek Questions / Rusty Main Shaft
November 29, 2009, 07:38:16 PM
I bought my Tormek Supergrind 2000 back in 2002.  I've been using it all these years, and ignored the warning signs of wear: squealing bearings.  But the other day the main shaft would no longer spin unless I exerted a lot of torque by hand, so it was time to take it apart and see what's what.  The grindstone had worn from the original diameter of 250 mm to about 200 mm.  I broke it trying to free it from the main shaft. 

If I had it to do over I would have instead removed the drive wheel from the other end of the main shaft, and then driven the main shaft out still attached to the grindstone.  The main shaft was rusted around and into the bearing at the grindstone end of the main shaft, so I don't know if I could have done it this way without breaking the grindstone.  But it would have been worth a try.

So, anyway, after breaking the grindstone, I chipped away the rust from the main shaft, which was quite a job.  The grindstone had pretty much melded itself into the rust-encrusted mainshaft.  I had to chip rust away just to remove the bearing from the main shaft.  I managed to get it cleaned up and lubricated, installed a new grindstone, and I was back in business.  Except for one thing.  The new grindstone wobbles, and so does the honing wheel.

So, I've ordered a new main shaft (MSK-250 Upgrade kit) and I'm hoping that'll fix me up.

My question is this: What do you think caused all the rust?  And what can I do to prevent it from recurring?  One thing I used to do was leave the water in the tray after each use.  I think that leaving the water in the tray could cause the grindstone to wick the water in the tray up into the center of the grindstone, keeping the main shaft wet and causing it to rust.

I'm hoping that the new stainless steel main shaft, along with the practice of not leaving water in the tray, will help prevent this from recurring.  The other thing I plan to do is use a dust cover.

Is there anything else I can do to help keep the machine in good working order?