News:

Welcome to the Tormek Community. If you previously registered for the discussion board but had not made any posts, your membership may have been purged. Secure your membership in this community by joining in the conversations.

www.tormek.com

Main Menu
Menu

Show posts

This section allows you to view all posts made by this member. Note that you can only see posts made in areas you currently have access to.

Show posts Menu

Topics - Elden

#1
Drill Bit Sharpening / The Drill Press
December 14, 2022, 09:27:20 PM
Yes, this is the Tormek Forum and more particularly the Drill Bit Sharpening segment of it. I imagine that the majority of those reading this segment, however, own or have access to a drill press.

I have found the vintage booklet "The Drill Press - It Use and Application" produced by Walker Turner, to be excellent information. It does contain a nice section about drill bits.

http://vintagemachinery.org/pubs/detail.aspx?id=2101
#2
Knife Sharpening / Knife restoration anyone?
February 21, 2019, 01:33:13 AM
Interesting non-Tormek video about a knife restoration project. The Tormek could be utilized for the sharpenining.  :)

https://m.youtube.com/watch?v=_l50jd6vOuE
#3
Quote from: Jan on October 27, 2015, 06:49:00 PM

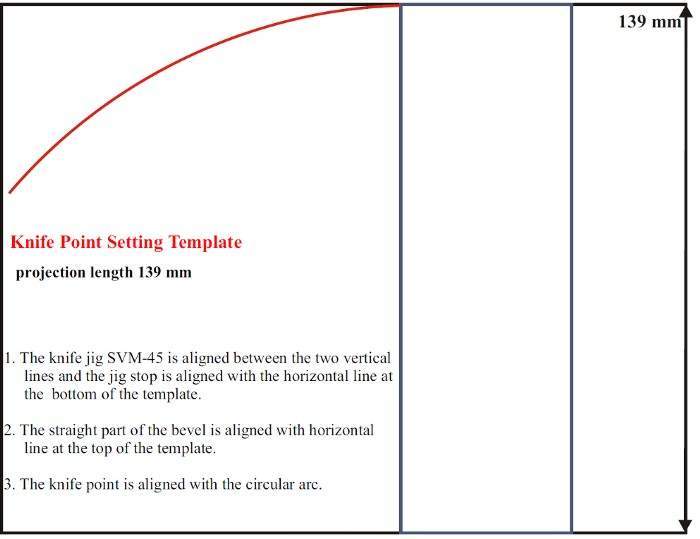
This template should allow easy knife mounting into SVM-45 knife jig, in a way that ensures the same bevel angle at the straight part of the blade and the point. Since that time I have slightly improved the concept and prepared a digital version of this template, which is now ready for your potential download.

The improved design of the Knife Tip Point Setting Template is here:


The template can be  downloaded/printed  from the following address:
https://www.dropbox.com/s/xqwn5xuk0r07z5d/TEMPLATE_139MM.pdf?dl=1


Print the image at the actual original size and check that the projection length is really 139 mm.

Jan


Jan,

   I use a Kindle Fire tablet and consequently can not resize the above image accurately or print it off. Would you show where the anchor point for your compass is located on your drawing? By using ratios, I know the drawing I am making is very close to being right, but would like it to be better than close. :)

Quote from: Jan on November 08, 2015, 06:30:25 PM
Ken, the most simplified version of an Excel spreadsheet entitled "KENJIG_wheel_support_distance_1" is available for download at the following address:

https://www.dropbox.com/s/ypbtaxgycgoyls0/KENJIG_wheel_support_distance_1.xlsb?dl=1


   For some reason after downloading this file, I can not open it. It is telling me the file is corrupt. The joys of a tablet, I suppose. ;)
#4
Quote from: Elden on April 12, 2015, 09:01:21 AM
If I am not careful, the drill and holding fixture will climb up the grinding wheel due to the wheel rotating away from the cutting lip. I see where this could be an issue even for one using both hands. This tends to happen less when the wheel is kept clean of the loading issue. Would it be possible to reverse the motor direction so that the wheel would turn into the drill bit lip?


Quote from: Elden on April 13, 2015, 07:56:52 PM
   I thought of mounting another horizontal base on the other side but the switch would have to be relocated.


Quote from: Ken S on April 14, 2015, 03:26:25 AM
I studied my Tormek (T7) earlier this evening to see if a fairly easy modification would be possible to add a second horizontal setting for the universal support.

A universal support with much longer "legs" would work nicely. Since I don't think that will happen, imagine this:

Look at your Tormek with the grinding wheel on the left. Push the long leg of the universal support through the horizontal sleeve next to the grinding wheel. That is the plane where the sleeves for the other side of the wheel would ned to be located.


With this modification, your Tormek can be used in the horizontal position with the grinding wheel either coming into the work or trailing. No modification of the motor or switch is necessary.


I am thinking of having my Tormek modified this way. In my case, I will have the work done by a local machine shop. It should be a fairly simple job not involving much set up time.

Ken,

   Those are excerpts from previous discussion.

   Have you tried using the DBS-22 with the extended USB you got from Robin, in the horizontal position on the back side of the Tormek? I remember that you had a water issue when trying that USB in the horizontal position, but thought that was in the normal  horizontal position.
#5
Drill Bit Sharpening / CBN for drill bits?
March 12, 2017, 12:28:16 AM
Quote from: Elden on April 12, 2015, 09:01:21 AM
   Loading of the grinding wheel proved to be factor I had to contend with. As it became loaded, the grinding noise quieted down causing me to think it had reached the stop before it actually had. For larger bits plan to use the stone grader more than once during the bit sharpening unless you only are doing touch up grinding.


Quote from: Ken S on April 12, 2015, 11:03:10 AM
I believe keeping the grinding wheel in optimum cutting involves more of a learning/experience curve than most us, myself included, realize. Being aware of sound changes during grinding seems important. Yesterday I reran a five minute grinding test wuth the black stone. I could not understand why   it did not outperform better than the standard stone grinding metal lathe tool bits (high speed steel with alloys). I redid the test after freshly truing the wheel. For most of the first minute, the stone made a powerful grinding sound. I was pleased. However, it quickly quieted down and gave me the same disappointing results the initial test produced. I do not know if my test is a good indicator. There may be factors I am unaware of. I do know that there was a definite change in the grinding sound. I have always paid attention to sound while grinding. I will intensify my focus in the future. I believe there is much to be learned by close observation.

   I am curious if anyone has tried doing drill bits using a CBN wheel on the Tormek, utilizing the DBS-22? It would seem to possibly make a good combination.
#6
Drill Bit Sharpening / Six facet grind with DBS-22?
March 11, 2017, 02:59:23 AM
   Is it possible to do a 6 facet grind with the DBS-22? This question started lurking in my mind after reading the article "DRILL POINT GEOMETRY by JOSEPH MAZOFF", the link to which RichColvin posted.

https://forum.tormek.com/index.php?topic=3263.msg19351#msg19351

   After considering the the idea along with some more research, I am thinking that it may be possible.

   This is not the first time this question has arisen on the forum. My memory was telling me that it had been brought up before. That is what the search feature is for, correct? In Oct. 2014, Scott oz posted:

https://forum.tormek.com/index.php?topic=2266.0

Interestingly, the link he posted was by Joseph Mazoff, the same author of the article that RichColvin posted the link to. Much of the the same material is in both articles. I do not remember reading the article Scott posted about at that time.

   The 6 facet grind has 2 Secondary Point Angles (SPA) added to the 4 facet grind. See the below attached photo. The picture also shows an added split point on the drill bit (labeled split). Ignore the split point as I am not referring to it at this time (that may be a future thought to think about).

   As I understand it, the SPA or the 6 facet is simply adding a more acute angle on the outer edge of the primary bevel and part of the secondary bevel.. This makes the sharp outer point of the cutting lip to be less pronounced (a chamfer so to speak) thus increasing the bit's longevity as well as other benefits.

   I found the following sites interesting. The first one is part of the second longer article.

http://www.gadgetbuilder.com/DrillSharp.html#Facet4
http://www.gadgetbuilder.com/DrillSharp.html

   Thoughts anyone?
#7
General Tormek Questions / Flattening a bench stone
January 15, 2016, 09:25:47 PM
Quote from Ken S:
"I almost ruined a two hundred dollar diamond flattening plate flattening my grandfather's old oilstone. I won't kill off the diamond plate or my hands with carborundum powder trying to rescue a twenty nine dollar stone grader. Like grinding wheels, it is a consumable.. The smooth side is also cupped. It has served honorably and has been retired."


   What is the best way to flatten a bench stone? That is a complex question which possibly can not be answered before some other questions are answered. One of those might be, what material  is the stone made of? Another might be, how much money do I want to spend to accomplish the goal?

   From an auction (the same one the drill bits came from), I acquired a badly dished bench stone. I think it is an aluminum oxide stone. It has a coarse and a finer side. The coarse side was much more dished than the fine side. The stone was included with something else that I wanted to purchase. I do NOT recommend buying a bench stone in that condition, it is repairable, however.

   With Ken's comments about his experience with such in mind, I tried a concrete block. It will work if you have a lot of time to spend and have several concrete blocks. The bench stone does an excellent job of smoothing the concrete block! There had to be a better way.

   Having a Makita 4 1/2 angle grinder and a masonry grinding wheel, I decided to give it a try on the stone. It worked much better and much more quickly. The masonry grinding wheels are relatively inexpensive and are readily available. Maintaining flatness of the bench stone can be a slight issue. Once the dishing of the bench stone is almost removed,  several swipes on the concrete block will reveal where the high spots are located on the stone. Lightly grind those spots. Alternate the use of grinder and of the concrete block until the stone is fully flattened. Finish by using the concrete block. I have done the coarse side and have started on the fine side.

   Will it work for the stone grader? I believe so, although I have not tried it. I think it should open up a fresh cutting surface as well as flattening the surface of the grader.

   Disclaimer: There might be some bench stones that may not respond as desired to the masonry grinding wheel. Is the stone grader one that will not?
   
#8
General Tormek Questions / Adopt a grinding buddy
January 05, 2016, 04:26:12 AM
   Have you ever considered taking a fledgling under your wing?

   I have a son who I would love to see take an aggressive interest in the Tormek (referred to as the "T" hereafter in this post). He is a very busy dad who operates a tree service. I sharpen his chainsaw chains for his several saws. He has been shown how to sharpen them and could pick up the process very quickly if necessary, but it is more convenient for old Dad to do it. I have had him help me sharpen some knives on the T as well and he probably will help me more in the future. BUT, he is busy and that really doesn't seem to be his interest, at least at the present.

   Several of the teenage boys at church have had me sharpen knives for them. I have enjoyed doing them for them. As I have stated in the past, using the T for knives is difficult for me as my left hand and arm do not function well. The work which I do, for the most part, must be done with my right arm and hand. Consequently, most all of the knife work is done on a DMT Aligner, as I can still use my left hand to hold the hone assembly. One of the young fellows has a Lansky hone setup. I have mentioned the T to him previously and he has acted interested.

   I have thought about letting him use mine. This past Sunday, I spoke to him about letting him use it and teaching him about it. That will include the great videos available and this forum. His reply? "I'd love to!"

   As all of us are getting older every day, consider it if yours aren't "aggressively interested".
#9
Knife Sharpening / Controversial dry or damp grinding
December 16, 2015, 08:40:12 AM
Removed by poster.
#10
General Tormek Questions / Member search function
November 07, 2015, 01:14:01 AM
Ken, Stig:
   I was going to follow Ken' s suggestion about reading through Jeff and Ionut's posts. I tried doing member search for Ionut (using search for members function) and received the following message:


Database Error
Please try again. If you come back to this error screen, report the error to an administrator.


   I can find them on the members list but wonder why I can't get the "search for members" function to work?
#11
Knife Sharpening / Knife Anatomy
October 28, 2015, 10:27:01 PM
   Knife structual terminology is a subject that I am not very familiar with. A quick internet search helps to temporarily take care of this problem (I then forget what I learned fairly quickly). Previously I have saved a couple or so pictures with the various parts labeled. Today I did another internet search and found an impressive site that is quite detailed on knife anatomy. I have not checked it out closely yet to see what all it has. The fellow is a knife maker. As stated, I have not checked it out closely. Thought I would share the link.

http://www.jayfisher.com/Knife_Anatomy_Parts_Names_Definitions.htm

http://www.jayfisher.com/Website_Overview.htm

http://www.jayfisher.com/index.html
#12
Knife Sharpening / Knife blade geometry
September 10, 2015, 08:13:46 AM
Interesting article about knife blade geometry.

http://www.knifeart.com/bladgeomfaqb.html
#13
Knife Sharpening / Paper knife sheaths availability
September 03, 2015, 07:48:28 AM
   Browsing through  the General Tormek Questions subsection (about page 18 as of Sept 1, 2015), I found this post by Dan (Exact Blade): 716y

http://forum.tormek.com/index.php?topic=1727.msg8553#msg8553

   I did not find a source for personalized protective paper sheaths he was looking for. However, at the following site protective sheaths are available in fairly small quantities. Apparently some sites require very large quantity orders.

http://www.knifesleeves.com/index.html

   They can be made from manila folders or other material, as well. I imagine, one could print the desired logo with a printer.
#14
   While checking out the T7 led promotional that Steve mentioned, I stumbled upon an upgrade kit for the Supergrind models. Included are:

  · XB-100 Horizontal Base
  · US105 Universal Support with Micro Adjust
  · MSK250 Stainless Steel Shaft with EzyLock
  · AWT250 Advanced Water Trough
  · AT250 Original Grindstone
  · HB10E Updated Handbook

   The price with free shipping included through that particular supplier, is currently $315 USD. They are all factory pieces and the price is presumably $70 USD less than individual price total.

   For one like me facing replacing a cracked grinding wheel and shaft because of  the "Rusted Drive Shaft Syndrome", the price is somewhat better. For $84 USD more, one could buy a T4. Ouch! :'(
#15
   I have a set of manual hedge clippers that are not cutting in the about the first half of the cutting action. Today on closer inspection, I found the main problem is a set  issue. The blades are gapping for about that first half of the blades. Tightening the tension bolt helped the situation minutely. The outer end works well. I have cleaned off the crud from the inside of the blades and the pivot.

   For scissors, I have a scissors press. It uses two pins set inline. Another pin, with a rotatable eccentric cam on it, is set in an offset position. The blade set is thus "sprung" into the blade. However, hedge clippers are much heavier duty. To make something similar, the press would have to be quite large.

   Has anyone used the arbor press style of scissors press? Does anyone have a good idea to place set in manual hedge clippers?
#16
   Recently on the hand tool sub section of the forum, I asked about sharpening dry wall knives on the Tormek. I had used a 4" belt sander which worked well. Herman and Ken both offered good suggestions.

   Ken sent some clarifying pictures in regard to his suggestion.  He asked that I would post them on the forum. He claims that he is a dinosaur! I think I am a 3/4 or 7/8 grown dinosaur!  ;D  Well Ken here is my attempt. Hopefully the pictures will be a workable size.


Hi, Eldon. These actually start at the bottom (I reversed them, EH), showing the position of the universal support bar, and the XP=100 alone, followed by the XP-100 with the piece of lumber. Then the scissors platform and the Turlock platform.

Care should be taken in having the two shorter legs of the universal support bar square to the grinding wheel. I recommend a better choice of clamp; this one was just handy for the photos. With the scissors platform and the Turlock platform, the clamping position can be used to provide more distance on the side of the grinding wheel. The thickness of the wood effects that, also.

Would you please post these on the forum for me. For some reason, this Neanderthal can not post photos to the forum. (I am working on it.)

I hope these clarify my idea for your drywall knives.

Ken


Positioning of the universal support bar (see first picture)


XP-100 mounted on USB (see second picture)


Board temporarily clamped to XP-100 (see third picture)


Scissors jig platform mounted on USB (see fourth picture)


Board temporarily clamped to scissors platform (see fifth picture)


SVD-110 Tool Rest mounted on USB (see sixth picture)


Board temporarily clamped to SVD-110 Tool Rest (see seventh picture)

#17
Hand Tool Woodworking / dry wall knives
May 28, 2015, 05:16:11 AM
   A friend brought some dry wall knives to be sharpened ie squared up. It was on the barter system. He had given me some dirt for raised garden beds. These knives are used for mudding sheet rock. They have a 90° bevel angle and have a thin, flexible blade. The  entire edge must be straight. Far as I know, it is not a good Tormek candidate. If you can think of a good way, post it. A significant amount of metal has to be removed, approximately 1/4" (6.26mm). This is from the sides (1/8"or 3.13mm from each side) as well as the working edge.
   The wood working 4" (101.6mm) belt sander did the job admirably in a reasonable amount of time with no over heating of the tool. Little 15 to 30 second breaks allowed it to cool quickly. On that thickness of blade, your hands make a well working heat sink.
#18
   Having posted a link to "An Ax to Grind" authored by Bernie Weisgerber and the information developed by the USDA Forestry Service for the guidance of its employees, I am posting it here in its own thread. Hopefully it will not be buried as deeply this way.

   The link to a pdf download is:

http://www.google.com/url?sa=t&rct=j&q=an%20axe%20to%20grind&source=web&cd=1&ved=0CB8QFjAA&url=http%3A%2F%2Fwww.fs.fed.us%2Ft-d%2Fpubs%2Fpdfpubs%2Fpdf99232823%2Fpdf99232823Pdpi300.pdf&ei=nJlKVYOID8nEggSdxYGICw&usg=AFQjCNGY2a233TBsiGOyQSPGhDV0erePag&sig2=kcOBJ1R3D81KVy01QHF3Gg

    It contains history, maintenance, and usage information about the axe. The author mentions a couple of other books he relied upon.

"Woodsmanship" by Bernard S. Mason (1954) which is out of print but available as a pdf at:

http://www.robin-wood.co.uk/wood-craft-blog/2011/01/01/woodsmanship-by-bernard-s-mason-free-download/


"Northeastern Loggers' Handbook" by Fred C. Simmons (1951); Northeastern Forest Experiment Station, US Forest Service
Pdf available at:

http://naldc.nal.usda.gov/naldc/download.xhtml?id=CAT87208315&content=PDF


All are excellent information if you are interested in axes and other old logging tool information.
#19
Drill Bit Sharpening / The DBS-22 learning curve
April 12, 2015, 09:01:21 AM
   A couple of years ago I purchased a DBS-22. Until yesterday it has been sitting with a partially sharpened 1/2" drill bit in it. Yesterday I completed sharpening it. It wasn't too difficult to do after watching Alan Holtham' s well done video. If I would have stopped there, I would have thought that is easy.

   The second 1/2" bit didn't go as well. I had not taken the time to read the DBS-22  operator's manual since I had watched the video a couple of times. That is not a good idea as there is some pertinent information that the video does not cover. One is that the barrel of S stop needs to be screwed back into contact with the P stop. A second is that twisting the drill bit counterclockwise a little beyond the parallel marks will help when doing more than touch up grinding.

   Loading of the grinding wheel proved to be factor I had to contend with. As it became loaded, the grinding noise quieted down causing me to think it had reached the stop before it actually had. For larger bits plan to use the stone grader more than once during the bit sharpening unless you only are doing touch up grinding.

   Due to limited left hand usage, I have to operate the Tormek using my right hand only most of the time. Mr. Holtham tells you where to place your hands for best operating procedures. It took awhile to figure out the best operating position and the proper hand position for my situation. If I am not careful, the drill and holding fixture will climb up the grinding wheel due to the wheel rotating away from the cutting lip. I see where this could be an issue even for one using both hands. This tends to happen less when the wheel is kept clean of the loading issue. Would it be possible to reverse the motor direction so that the wheel would turn into the drill bit lip? Yes I know it probably won't happen at the factory because the honing wheel would be turning into the edges of tools when mounted in the jigs utilizing the USB in the horizontal position.

   I think a person can reasonably expect the grinding to take longer than the video shows. I believe Ken said 12 minutes (not all that time was spent in sharpening as part was solely instructional) for the video. If you look at the close up of the drill bit at about the 10 minute 30 second point, you will notice that the left primary cutting lip, as you face it, appears to have a chip in it. I do not see it in the later close-up. Thus more grinding would have been required than was shown. Also I have to add quite a bit of time for my sharpening because I am not nearly proficient as he is.
#20
Is it possible to get a flat ground surface from a vertically orientated grinding wheel?

The answer is yes. Look at a surface grinder such as used in a machine shop. The work is moved horizontally in the xy plane under the vertical grinding wheel.

Can a flat surface grind be generated on the Tormek without using the side of the wheel?

Once again the answer is yes however, it is a reserved yes.

Foley Belsaw makes a 1055 Sharp-All that is a dry grinder. Prior to having a Tormek, I sharpened chisel and jointer knives on a 1055. It formed an excellent flat and sharp bevel with a 4" diameter grinding wheel. This was accomplished by using a precisely and controlably tilting table that locked at various angles. A jig held the tool which  could  be slid on the table top.  The jig maintained the distance from the grinding wheel while the table maintained the bevel angle. The depth of grind was fixed, albeit adjustable.  The tool was presented toward the side of the grinding wheel, however, held up so that it contacted the round face. By sliding it back and forth on the table, the sharpening was accomplished. A flat bevel was formed.

I believe this can be accomplished on the Tormek by:
1. Make a USB that has a 90º bend so that it parallels the side of the grinding wheel.
2. Make a locking table so that the bevel can be set similarly to the scissors jig base. It may need to be larger depending upon the tool to be sharpened.
3. Make an appropriate holder that would be referenced by the back side of the table. In my case use the one from the Foley Belsaw 1055.

It might be the planer blade attachment could be used. I do not have one to check it out.

Thoughts anyone?