News:

Welcome to the Tormek Community. If you previously registered for the discussion board but had not made any posts, your membership may have been purged. Secure your membership in this community by joining in the conversations.
www.tormek.com

Main Menu
Menu

Show posts

This section allows you to view all posts made by this member. Note that you can only see posts made in areas you currently have access to.

Show posts Menu

Messages - Waterstone

#1
General Tormek Questions / Re: chisel sharpening
February 15, 2017, 01:44:42 PM
Quote from: Ken S on February 15, 2017, 12:47:17 PM

I have compared freshly ground chisels from the T4 and T7. I find it difficult to see a difference by eye. I can see that each is hollow ground, however, the amount of hollowing seems miniscule.


Ken,

Jan shows above with his excellent sketch, that the influence of the hollow isn't that miniscule. The difference between the ground angle and the one at the blade tip is about 5 degrees. I don't want to have this kind of deviation. My bench chisels work very well with 30 degrees, with 25 the edge durability will be bad. I've tested it.

You're completely right, that there are many different types of chisels and blade materials. My bench chisels for general purpose work best at 30 deg., the paring chisels are working good with 25 deg. and the mortise chisels want to have 35 deg. at least. But that's not the point to my eyes. Regardless the angle you want to have on the chisel you are grinding, you want to have it as exactly as possible. 5 deg. more or less won't do it.

Klaus
#2
General Tormek Questions / Re: chisel sharpening
February 15, 2017, 08:31:05 AM
Thanks a lot, Elden.

It was an interesting read for sure. I completely agree with the conclusion that a hollow ground edge doesn't necessarily has to be weaker than a flat ground bevel. If you compare a 25 deg. flat ground bevel with a hollow ground bevel that has 25 deg. at the very tip, the hollow ground bevel indeed is stronger, no doubt.

However the Tormek angle master doesn't compensate the hollow when adjusting an angle to my experience. If it's adjusted at 30 deg. I get an angle of exactly 30 deg. measured from the edge tip to the 2nd end of the hollow. You easily can test it. If the stone doesn't have the full diameter, it's even easier to see because of the more pronounced hollow it creates. So I don't get 30 deg. at the edge tip where I want to have it.

To get the wanted angle at the edge tip I've to set the angle master at 35 deg. OR I hone the 30 deg. hollow ground bevel in the above mentioned way by using both edges of the hollow.

Klaus
#3
General Tormek Questions / Re: chisel sharpening
February 14, 2017, 06:51:51 PM
Quote from: Rob on February 12, 2017, 09:41:09 PM

In fact, by resting the chisel on a fine stone at the two touch points created by a hollow grind (the edge and the other end of the arc described by hollow grinding) you are in fact honing a very fine micro bevel without realising it! 

Good point Rob.

In fact you'll get a small honed area at the very edge that looks like a micro bevel. It's a question of definition after all. To my understanding a micro bevel or secondary bevel is steeper than the primary bevel. If the latter one is ground to 25 deg, the secondary bevel will be 30 deg. or so.

On the Tormek the things are different. If the blade was ground at 30 deg. (what is my most used primary bevel on chisels), the honing will keep this angle. The "micro bevel" will be exactly 30 degrees. Why? The 30 deg. hollow grind that was produced on the Tormek will cause the very bevel tip to be less than 30 deg. due to the hollow geometry. When it will be honed by using both "edges" of the hollow, the edge tip will be "corrected" to be exactly 30 degrees. It's easy to test it.

So while I agree with all of your comments, I doubt that this honed bevel can be called a micro bevel in the usual sense (steeper angle).

Klaus
#4
General Tormek Questions / Re: chisel sharpening
February 07, 2017, 06:59:46 PM
Basically I agree, Ken.

But if you explain to the customer that in this case a micro bevel is a disadvantage for himself, he possibly will think about it. The customer himself will enjoy the ability to hone the chisel many times until a new sharpening on the Tormek will be needed by taking advantage of the hollow grind. It's so much easier to refresh the edge this way than to refresh a micro bevel freehanded.

Klaus
#5
General Tormek Questions / Re: chisel sharpening
February 07, 2017, 03:36:49 PM
While sharpening chisels on the Tormek, a micro bevel won't be needed at all. In the opposite a micro bevel will take away one of the biggest benefits the Tormek offers. It's the ability to do the honing work freehanded by using both edges that the hollow grind produces as registration areas on the flat honing medium. The honing work after the Tormek sharpening is absolutely necessary to get the chisels best performance and the best edge durability. Doing this by using the hollow grind is a quick and foolproof freehanded action.

I'm used to sharpen my chisels for years this way and am rather sure that they perform at their best.

Klaus
#6
General Tormek Questions / Re: CBN Wheel for Tormek
November 16, 2016, 06:22:54 AM
Maybe you know Derek Cohen, an Australian furniture maker and tool maniac. He had similar issues with CBN wheels. He's running them on a dry grinder but the point is the same.

http://www.inthewoodshop.com/WoodworkTechniques/UltimateGrindingSharpeningSetUp.html

Klaus
#7
Hand Tool Woodworking / Re: Spokeshave Challenge
November 07, 2016, 10:39:23 PM
Keen eye, Robin ;)

Indeed I didn't polish the inside bevel. It's not easy for me to get that done properly because it's hard to see if the angle is correct while doing that freehanded. There's a risk to round the bevel. So the sharpness could be improved another bit by polishing the bevel. But: it already is really sharp!

The honing (polishing) of the face I did all the time. It might have given a tiny angle increasing since the hollow grind from the Tormek is flattened in the very edge area. Nothing wrong with that. I don't care too much if the cutting angle is 28, 30 or 32°. They all will work fine.

A sidenote: it's the first time that I was able to operate the tool with a very light grip. This makes the tool to cut thin and narrow shavings with very little resistance. The control of the cut is truly better with a light grip.

Klaus
#8
Hand Tool Woodworking / Sorted!!
November 07, 2016, 06:47:45 PM
I'm done! Done in a rather satisfying way, that's for sure. Not only the particular shown blade now is razor sharp and has a sturdy edge, more important is that the further sharpening of these blades can easily repeated with a very controlled process.

The last pics showed a nicely ground face but a weak edge that was folded. The key was the inside shape of the blade indeed. After having spent some time to shape this bevel freehanded, I gave up rather frustrated. The result was poor. Then I remembered to have the knive sharpening jig SVM-45 ;D. This is able to clamp the circular blade in a way that the bevelling could be done. The next step was pretty clear. I had to use the flat side of the Tormek stone to install the inside bevel. Wow, that went really good.
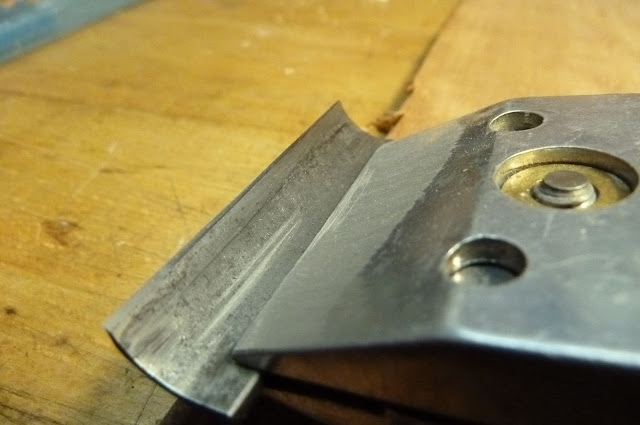
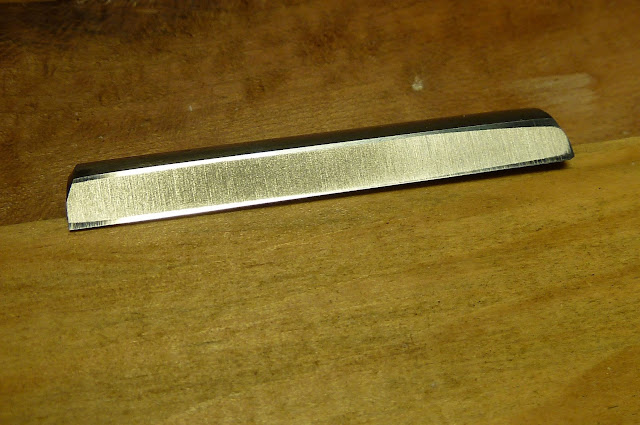

Hard to spot but there is a correctly shaped inside bevel at about 30°


After this was done the face needed a touch up on the Tormek and a little handhoning.


Time to test it :)


Fine full width shavings and an easy to work tool!

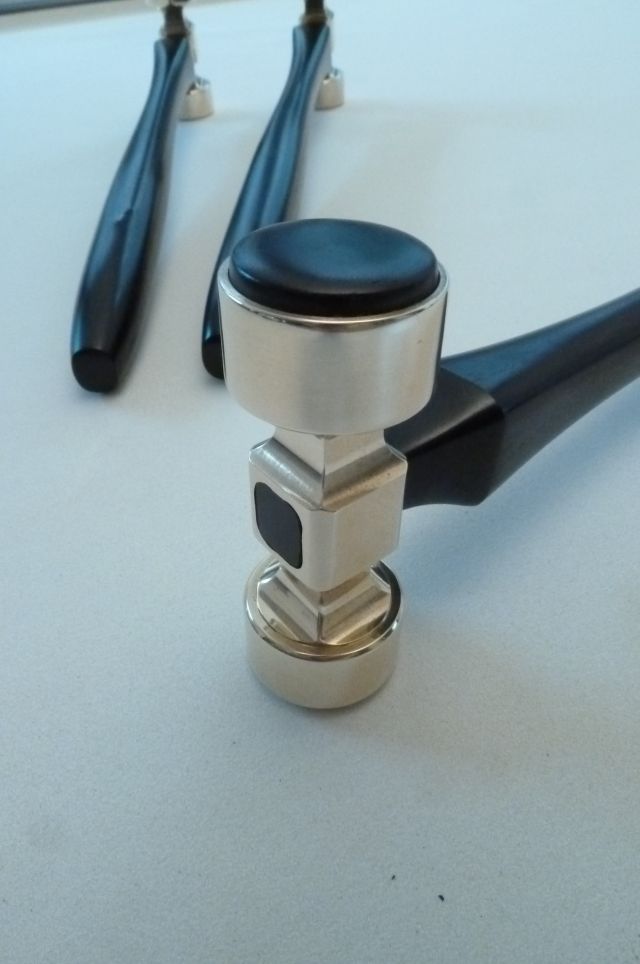
Now it will be the right time for some workpieces. Probably a few more hammers like these ones:


My special thanks are going to Robin for his ongoing support!

Klaus
#9
Hand Tool Woodworking / Re: Spokeshave Challenge
November 06, 2016, 06:31:33 PM
Hello Jan,

once the blade is sharp and the set up is right, the tool is able to do much more than to shape concaves. It does convex shapes as well very easily. Jimi Hendricks shows it at WK Fine Tools

http://contrib2.wkfinetools.com/hendricksJ/cigarShave/cigarShave-01.asp

For all kinds of oddly shaped workpieces, the cigar shave is a go-to-tool.
Jimi shows the handsharpening of the cutter. I tried it and it works so la la to me. Never got it razor sharp this way. Now I'm looking forward to getting this tool as sharp as it deserves it.

Klaus
#10
Hand Tool Woodworking / Re: Spokeshave Challenge
November 06, 2016, 03:49:12 PM
Robin, you actually are killing me! The speed you throw out new ideas and these brilliant matching sketches is just stunning. Will have to test all of your proposals. Lots of thank yous another time.
I have two of these blades. One is pretty short already, perhaps 5 mm rest life. The other one is rather good. Ok, it has been pretty long before I began the Tormek grinding attempts  :D But it still has a lot of rest life.

Klaus
#11
Hand Tool Woodworking / Re: Spokeshave Challenge
November 06, 2016, 01:30:00 PM
Hi Robin,

this whizzo thing is cool!  8) 15° is exactly what the angle finder on the WM-200 is telling as well. Pretty clear that this angle never will work. The problem is, that the face can't be ground smaller. Currently it has 6 mm. Less won't work since the back of the face then would be deeper than the cutting edge once the blade is inserted. Here a pic that shall show it though the quality isn't the best.


So the grinding better won't be done up to the very edge. Leaving 1/10 mm probably will be better. The cutting angle needs to be increased anyway. I guess that this has to be done by bevelling the inside surface.

Many thanks for your ongoing help!

Klaus
#12
Hand Tool Woodworking / New jig and a big issue
November 06, 2016, 10:29:03 AM
I've made a new jig that was built in a way to allow the 'Underhang Sharpening' by using the SE-76. The blade is sitting somewhat tilted inside the jig. So the blade is perpendicular while sharpening, the jig itself isn't. When it was finished I was delighted to state that it works on the horizontal USB very well. That's how it looks:


It's a very safe and controlled sharpening process just the way, that all of us are used to get from the Tormek. The ground bevel:


I'd say the result is close to perfect.

After a quick freehand honing the cutting edge looks like this:


With some anticipation the blade was inserted into the spokeshave. First cut and ...Wow it works very well! Second cut ... what's going on? Only a very narrow shaving. Third cut ... it doesn't work at all! What was happening? The middle part of the edge was folded  :-[


Obviously the edge is way to weak. The inside surface of the cutter needs to get a bevel to strenghten the edge. Will have to think about a fastener that allows the controlled bevelling of the inside surface. Doing this freehanded is a PITA.

Will keep you updated.

Klaus

#13
Hand Tool Woodworking / Re: Spokeshave Challenge
November 04, 2016, 10:14:40 PM
Yes Robin, it's lousy cold here as well!

Thanks for the latest pics. I think that I have to give the underhang technique a serious try. If that works, the sharpening process will tend to get fool proof. Have to wait until tomorrow however since I've epoxied the screw heads into the bottom plate. This will need 24 hours to dry.

Klaus
#14
Hand Tool Woodworking / Re: Spokeshave Challenge
November 04, 2016, 08:52:54 PM
Hi Robin,

the outside surface of the blade is flat. Oddly the ground bevel is flat from side to side as well.
The inside edge was honed with grit 1000 after the Tormek grinding. I will try to get that done your way.
The minimal protrusion of the jig inside the SE-76 is exactly 50 mm. It can be altered up to 70 or 75 mm.


The bevelling of the plates has to be done indeed. The grinding action can't be seen the way you want it to have. Good idea!

Maybe the jig or my technique (probably the latter :D) can be optimized but all in all I'm pretty pleased already. Never had this spokeshave that sharp before. That counts.

Klaus
#15
Hand Tool Woodworking / Update *PICS*
November 04, 2016, 07:01:29 PM
Hi all,

meanwhile I finished a jig for the oddly shaped cigar shave cutter. First and foremost I've to thank Robin for helping me to get into the saddle. And more than that for patiently answer any question I had regardless how silly the've been  :)

Like Robin proposed the jig was made of acrylic sheet (6 mm). The circular blade is sitting firmly on a halfround piece of acryl. The first attempt wasn't successfull, when I tried to hold the cutter by letting the rear edge running through a slot in the top plate. Wasn't able to make this slot in a way that it held the cutter truly rectangular and tight. This is how it looks (the screw heads are countersunk to get a flat bottom surface):


The dismantled parts:


After grinding the cutter:


As you can spot the edge isn't dead straight but very slightly concave. User error however. It was the first attempt after all. I'm not familiar yet with the jig and with the SVD-110 use in this case.

The jig is shaped in a way that it can be inserted into the SE-76. This would probably sort out the above mentioned issue. But the blade has to be sharpened in a way that it has to be presented nearly rectangularly to the stone. Currently I've no idea how this can be managed with the SE-76.

Anyway, after some (quick) honing on a flat medium, the cutter is definitely sharper than I ever was able to get it by hand sharpening. The tool works how it should, it's a joy!


Klaus