News:

Welcome to the Tormek Community. If you previously registered for the discussion board but had not made any posts, your membership may have been purged. Secure your membership in this community by joining in the conversations.
www.tormek.com

Main Menu
Menu

Show posts

This section allows you to view all posts made by this member. Note that you can only see posts made in areas you currently have access to.

Show posts Menu

Messages - aquataur

#61
Thanks Rick.
It astounds me that those wheels are less than perfect. I thought this was the very reason of their existence...
Well a conventional wheel can at least be trued, and even this only lasts until you change wheels...
Imho mounting it the next time you would have to true it again. As if they grew unbalanced hanging on the stand in the same position because of the water they retain...
#62
Rick, if you monitor this, I would like to know what the long-time resumé of your SPA mission was.
I have mixed results momentary, but this can be down to the drill which seems to have a precession.
#63
This is exactly what I was driving at. At some pitch dependent on the drill type will grip into the nothing. This will become increasingly probable with drill size.
Anything rigid like a strip of metal or, as I used it, a strip of PCB board, will simulate a infinite contact area. The pins only contact throughout their centerline axially.

Using a strip of PCB board turns out to be a happy coincidence, because even thin ones are pretty rigid because of their glass-fibre reinforcement. They are always straight, don´t bend, don´t produce burrs on cutting edges and are easily cut.
#64
More evidence for using SPA´s:

I happened to stumble across a vintage book from 1934 which Elden has linked to to. On page 35 it says:
QuoteIf the novice finds it almost impossible to grind a drill to the prpoer angle on lip and pitch, he can make use of the trick of first drilling a hole, smaller in diameter than the required hole is to be. (...) The (...) drill of the size of the hole selected should then have the outer end of the cutting edge slightly ground away at an angle of about 45° so a to show a flat of about 1/16" [rem. 1.6mm]. This drill is then used as a reamer (...)
(see attached picture; source: The Drill Press, Walker-Turner Co., 1934)

This sounds suspiciously like an SPA.
In the subsequent chapter they speak about Reduced Rake for drilling Lead that seemingly does a similar thing.

In a different vintage book The Use and Care of Twist Drills : Cleveland Twist Drill Co it says on p.53

QuoteIf a drill is sharpened with a large included point-angle,as in Fig. 47, the zone of abrasion is comparatively small,as at M. Dulling will, therefore, be proportionately hastened. By sharpening with a small included angle, as in Fig. 48, the area of the zone of abrasion N is greatly increased and with it the life per grind. To further increase this abrasive area, and with it the grinding life, it is sometimes advisable to grind a secondary angle at the corners of the drill, as shown in Fig. 49.
(see attached picture; source: as above, p.53)

Note that with such a large secondary point angle cutting lip length, nearly as long as the main (primary) cutting lip, it is obvious that some secondary relief has to be provided. Again, no details are given here, but this supports what Mazoff has said and lets it appear to be not only mere claims.

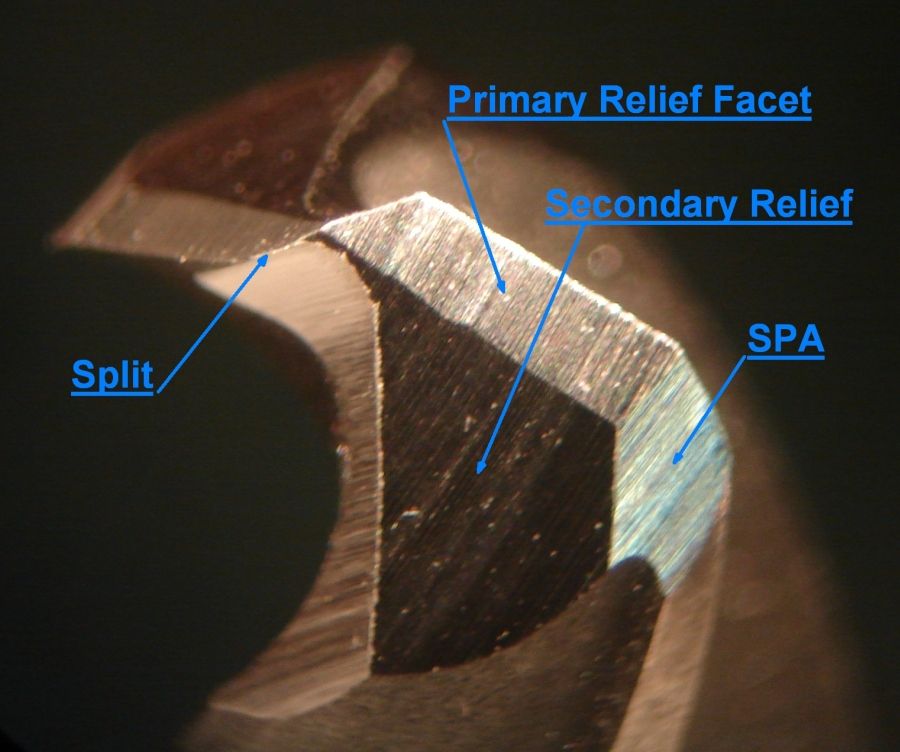
If you look at Mazoff, figs. E-H (Mazoff, Drill Point Geometry), in fig. H you can clearly see that right behind the SPA area the secondary relief (of the main grinding lip) starts, which clearly eliminates the need of a separate relief for the SPA facet.

With terminology, we have to be ultra careful from now on. Each facet may have its own relief plane. The primary (grinding) facet (which is in the absence of a secondary  grinding facet=SPA probably not termed as such) has a primary and secondary (and maybe tertiary) relief facet, but so has the secondary grinding facet...
#65
Quote from: RickKrung on June 14, 2023, 10:44:52 PM(...) just didn't recognize the acronym.

It was you who was the first to use this acronym during your mission  ;)
#67
As a follow-up to my thread on 4+facets and SPA´s and fuelled by Rick´s Mission I´d like to speak about my findings regarding SPA´s.

I suggest reading Mazoff´s document (which has been quoted countless times here) if any of the following terms sounds non-familiar.

After making the mod Rick suggested to the jig´s baseplate, which worked perfectly (thanks man), those questions arose immediately:

  • do I need SPA´s at all?
  • how much SPA do I grind?
  • at what point angle?
  • at what relief?

Gadgetbuilder mentions in his great building document ZIP file containing the sharpener plans
Quote(...)claimed by Joseph Mazoff in his "Drill Point Geometry"[1] document. Adding Secondary Point Angles (SPAs) improves the drill's self centering tendency, improves hole finish, reduces drill wear, and reduces the exit burr when through drilling.

So let´s make it clear before we start, this statement of Mazoff is what everything goes back to. Apart from seeing SPA´s appearing on some drills, we have no evidence other than his claimed experience. I don´t think we have reason to doubt, but let´s agree that this is momentarily a claim.

That settled, Gadgetbuilder´s experience seems to support the claim:
QuoteBoth split points and SPAs help to reduce wander when drilling deep holes.

and
QuoteThese extra facets cause the drill to have a stronger self centering action and the sharp outer point on the cutting lip is eliminated so the drill remains sharp longer. The chip is weakened by the difference in cutting action between the primary and SPA facets so long spirals are less common because the chips are prone to break. (...) When through drilling the SPA reduces or eliminates the exit burr on most materials.

but now comes the caveat:
QuoteSecondary relief can be added to the SPA but isn't necessary for small SPAs.

QuotePhoto 13 shows an 8 facet drill with large SPAs, so large that secondary relief was needed for the SPA -- and even that wasn't enough. This drill was tested by drilling several holes in 1/2" mild steel, which produced heat discoloration in the heel area from rubbing. Hand grinding this area could eliminate this contact but instead I use smaller SPAs since they increase drill life without the hassle of hand tweaking the heel.

QuoteSPAs can improve drill performance or, as noted above, can degrade performance if too large so work your way up in SPA size.

Gadgetbuilder´s resumé on the claims was:

QuoteThe 1/4" drill I experimented on cuts steel nicely but it is impossible to evaluate whether all the claimed benefits are actually realized without conducting a controlled experiment. However, it is easy to do and works well so I commonly add SPA facets to drill bits - mostly bits larger than #25 since smaller bits usually cut well even without an SPA.

Drill # 25 is IIRC something not far away from the smallest drill the jig can sharpen, so this practically concerns all of our drill sharpening tasks.

So my momentary answers to the above questions are:

  • maybe not exactly need, but helpful on larger drills
  • better too little than too much to start with. Time will tell. Unfortunately no cook-book recipe for this.
  • the point angle was never mentioned, but since it is an extension of the primary cutting lip, I presume: the angle chosen for the task (setting "P" on the jig).
  • none for small SPA´s, secondary relief for bigger ones. Angle assumed equal to setting "S" on the jig.

For starters, I would leave it away. It is unclear, if any assymetry would impair the drilling action resp. how tolerant the drill is towards imperfect SPA grinds.

Experience welcome.
#68
I would like to bring up some subjects, but since there is tremendous uncertainty about the terminology of 6-facet grinds I would first like to clarify that.

There is no consensus as to what a 6-facet grind is. Some think it is a 4-facet grind plus SPA´s (and indeed Mazoff in his well-known article speaks of a 6 faceted drill with secondary point angles (SPA) which could be interpreted this way), but others speak of added relief facets extending the primary and secondary relief planes by a even steeper relief plane, sometimes called tertiary.

QuoteThe 11/32" drill shown at right has small SPA's added making it 6 facet.
( GadgetBuilder alias John Moran on Drill Sharpening Etc, chpt. ,,Honedrill")

QuoteAn article by Derek Brown appeared in Model Engineer issue #4025 describing some additional jigs for the Quorn to facilitate "6 facet" sharpening. This process extends the 4 facet process, adding another secondary relief (ternary relief?) at 45 degrees, again arranged so all intersection planes meet precisely at the drill axis.
(Ron Chernich on Drill Sharpening On The Quorn chp. "Six Facet Sharpening")

QuoteFour facet drill sharpening (...) Secondary Point Angles (SPAs) can be added to extend drill life, improve hole finish and minimize the exit burr on through-drilled holes.
( GadgetBuilder alias John Moran on Drill Sharpening Etc, chpt. ,,A Powered 4/6 Facet Drill Sharpener"

So by now it should be clear that SPA´s are not limited to a certain sort of grind.
Neither are methods for web thinning like splits.

QuoteThe point can be split on 4 facet or conical drills.
( GadgetBuilder alias John Moran on The Home Shop Machinist post#8: "4-facet" vs. "split-point" drill grind definition)

(Note the great compilation by Arthur Marks in the end of this document.)

I will address both subjects individually in following threads shortly.

Having that cleared, I would like to bring the tertiary facet to your attention.
Ron Chernich mentions this extra facet in the link given above, but he is not very clear on the purpose of this added complexity.

The secondary relief is commonly said to be about 20° (Chernich: 25-30°). I believe this is not critical, since with the DBS-22 it will have slightly different angles dependent on the drill size.
The tertiary relief according to Chernich is 45°. Akin to the seconary facet, it has to be carefully ground up to the tip.
[/img]
(Source: http://modelenginenews.org/meng/quorn/images/q6f_2.jpg)

Now on the DBS-22 you change from grinding the primary facet to the secondary by advancing the pin vise assembly one notch, after tilting the whole jig. The resulting relief angle remains to be determined.

Logic tells that repeating this step again by advancing the vise even further will produce a third facet – and this works. I encourage you to try this, but be careful and hold the vise firmly, it tends to get caught by the wheel. Let us know about your results, folks.

I recommend reading the pages on Gadgetbuilder´s drilling adventures linked above, particularly the ZIP file containing the sharpener plans., which is full of information on SPA´s, facets and splits.
#69
Rick,

I ran into the same problem recently. It was a brand new 12mm drill (close to a half inch drill), and I just sharpened it without checking.
When I changed to the second side I noticed that I would not reach the stone at all, which is a clear sign of misalignment. I thought I just turn the knob a bit to compensate, but this resulted not only in unequal lip lengths despite all fumbling with the caliper, but also in wrong point angles.

I read here that drills are made for a specific point angle, in so far as the helix angle correlates to the point angle. Grinding a different angle will invariably make the cutting lips convex or concave - which is what I experienced. The resulting angle was considerably smaller than the desired 118°.

The drill was unusuable this way - nothing but flutter.

I remembered your article:

Quote from: RickKrung on May 09, 2018, 07:35:04 AMThe best I could figure out is that there weren't enough contact points of the flutes with the fingers. 

but contrary to your assumption I believe that the fingers of the V-vise start to approach in size to the valleys between the flute contact points. In other words, they become too small to make a secure contact on all of them. Some of them grip into the nothing. This may be subject to manufacturer´s peculiarities but is prone to happen with increasing diameter and/or increasing flute angle.

This is my explanation. That said, it does not matter.
Your collet solution is brilliant, but restricts you to a single diameter, plus most of us won´t be able to make one.

Since the drill only contacts the V-vise´s sides on the flat parts, you may as well use something flat - like strips of scrap PCB epoxy board. I chopped down four strips á 10mm, and with some slightly broader strips, maybe three different widths you cover all sizes up to the max. For small drills the flute gap is small compared to the vise´s fingers, so this is not needed.
This way you may not be able to sharpen the maximum size drills as per the jig´s spec´s, but then a drill that size will a) not often be seen with hobbyists, b) overload typical hobbyist´s drill press devices anyway besides being dangerous, and c) may as well be sharpened with something like the simple jig forum member Jan devised.

(For those calibers we might rather dwell on some web thinning, but this for another time.)

Since the poor drill was mutilated beyond recognition I followed the often uttered suggestion to straighten the bit out on a bench grinder beforehand to do the motherload of work.

This suggestion has to be taken with a grain of salt, because it comes from people who do a lot of tool sharpening. I have never seen one of them not using a wheel with white aluminium oxide which is said to run much cooler than anything else. I have tried this action on my cheap bench grinder equipped with a normal corundum wheel and the drill´s point turned blue immediately.

So I continued with the wet grinder. Needless to say, this time the drill bit sharpens flawlessly.
(I´ve also put SPA´s on it, but again, more on this shortly)
#70
Knife Sharpening / Missarka Wheel (special order)
March 30, 2023, 02:25:58 PM
This information is intentionally removed.

All information I ever give is free. I have nothing to sell.
In fact, to be even confused with that, is shocking and almost affronting.
#71
Quote from: 3D Anvil on March 23, 2023, 05:49:01 AMI'm sure most of you know this already,

Well I didn´t ;) I wasn´t even aware of such a device, but I admit I was not regularly browsing this forum for the past years.

Quote from: 3D Anvil on March 23, 2023, 05:49:01 AMthere is a pretty easy way to measure the angle of the primary grind.  It requires an electronic angle cube

It became obvious in this context.

Quote from: 3D Anvil on March 23, 2023, 05:49:01 AMIt [the angle master] needs to be *directly* on the edge bevel to be completely accurate.
This fact is not as obvious as it should be (as mentiond above), I learned it the hard way.

As I mentioned above, after all questionmarks have been resolved with the aid of you all in this discussion, I dropped the AM for knives. I also don´t see a need for an electronic angle cube. Setting the angle with the T-USB parameter is very easy and works with low-tech tools as it gets.

The problem with a primary bevel is how to grind it on the Tormek. We speak of angles probably below 10dps, which I have addressed here.

I believe the exact angle of a back bevel (primary bevel, relief) is not important, and AFAIK there is no agreed upon numbers for it.
BTW in Perra´s Angle Calculator Lite 1.4 the formulae under Edge and Bevel Calculation lets me estimate the back bevel´s angle quite well.

#72
Quote from: cbwx34 on March 22, 2023, 03:08:16 PMFor me, the issue is about improving consistency, not necessarily precision.  (If you're using the AngleMaster, precision is probably not a main point anyway.)  Using a flat ruler is arguably more accurate than setting the AngleMaster on the side of a knife...

I agree. With the AM the result will be better using the ruler, with a digital cube the offset is not relevant.
#73
Knife Sharpening / Re: YATU: Yet another T-USB jig
March 22, 2023, 07:22:03 PM
This thing is actually nothing more than a twisted caliper.
Stock calipers measure an outside dimension, and on the back side they usually have some crippled flanges that measure inside, but what we have here is a combination of both:

the gadget measures the distance from the 12mm hole (resp. shaft) (outside measurement) to the stone´s surface (inside measurement).

If such a thing were available then - go for it...
#74
Knife Sharpening / Re: YATU: Yet another T-USB jig
March 22, 2023, 07:08:08 PM
Quote from: cbwx34 on March 22, 2023, 03:18:43 PMthe TTS-100 Turning Tool Setter works independently of the diameter of the grinding wheel.

The TTS-100 does what it promises no doubt.
I did not look into this device, but it is obvious what the two rollers do:
Those are two points forming a secant on the circle of the wheel. The line inbetween them is always perpendicular to the line between the apex (halfway between those points) and the center of the circle.

The TTS-100 must use this effect to achieve its designated purpose. Akin to all the calculators it must use plain trigonometry cast into hardware.

As @tgbto mentioned correctly, a swing like this could be made to help align the YATU towards the center, but solely adding two rollers to each side of the red cube (along the circumference) will either hinder the latter from reaching the stone (if the rollers are too close) or be ineffective when the red cube touches the stone (if the rollers are too far apart).

So the roller - swing cannot be physically connected to the red cube, if you want the red cube to give you the correct distance to the apex (provided the ruler is aimed to the center...). Like the rollers themselves, this would need to be low-friction or it will not settle correctly.  In fact even the part attached to the USB would probably need to be low friction. The roller-swing would need to be touching the stone permanently, independent of the red cube´s position.

Deviating the ruler from the line towards the center has less effect on the ruler´s reading than one would think.

So this stunt is doable, but the effort is enormous compared to the simplicity of the YATU, with a little gain in comfort, no gain in accuracy, and a great gain in complexity (=loss of "make-ability").
#75
Quote from: ArtOfSharp on March 22, 2023, 04:12:45 AMThe measurement on the top of the ruler is at the same distance as on the bottom of the ruler

This is certainly true for an angle cube, or whatever those digital units may call themselves, but not for the angle master. The error may be small, but this whole issue is about improving precision.