News:

Welcome to the Tormek Community. If you previously registered for the discussion board but had not made any posts, your membership may have been purged. Secure your membership in this community by joining in the conversations.
www.tormek.com

Main Menu
Menu

Show posts

This section allows you to view all posts made by this member. Note that you can only see posts made in areas you currently have access to.

Show posts Menu

Topics - Mike Fairleigh

#1
General Tormek Questions / DBS-22
September 18, 2017, 05:59:19 AM
In case anyone has been holding out, the drill jig is $50 off right now on Amazon.


I dont have one, and have been on both sides of the fence with it, but thought I'd pass it along.
#2
So... who's going to be first?  ;D

I'd love to have one - I'm painfully aware of my T7 being too high and know my results would be better if I could get the machine down a bit.  But I've got a real problem with floor space in my shop.

A couple of things that I think could make it even better, just from what I see in the photos:


  • I would like to have seen the entire top, including the structure (corners) be protected from corrosion by something more than just a coat of paint.  I think a heavily used station will end up with water getting in contact with welded seams.  But I'll reserve judgement about that until I see one in person.
  • It would complicate the height-adjustable aspect of the design, but making this station mobile would have been an excellent idea.  Yes it can be put on a shop-built or 3rd party mobile base, but for what I imagine this unit will cost, IMO it should be a built-in feature.
In general I think this station is a great idea.
#3
On my high-end WW tools, my sharpening routine is:

1. Flatten backs using 3M Stickit rolls of 80-220 grit on a granite slab.

2. Polish backs up through 8,000 grit on Shapton Glasstones.

3. Re-grind the bevel on the Tormek; since virtually all of my blades are A2, I sharpen at 30 degrees.

4. Polish the bevel on 1,000 grit, then 8,000 grit Glasstones.

At the end of that process, assuming I took my time and didn't rush through or past a step (I just spent nearly 3 hours flattening the back of the iron in a new Lie-Nielsen 51), I have an incredibly sharp blade with a gorgeous bevel.  However, I don't doubt that a proper leather stropping would improve it - and that's where I have a problem.  If I take said blade and strop on the Tormek, the edge becomes worse, not better.  I've tried very light pressure; rather heavy pressure; making contact at the heel of the bevel and then raising up slowly so that the edge is just kissed by the leather - it doesn't seem to matter, I end up with some degree of dubbing no matter what.  I've seen the same results on every blade I've attempted to strop.  With each attempt, I end up going back to the 8,000 Glasstone to put the edge back where I started.

How do I know I'm dubbing it?  After the Glasstone, the edge reflects no light and cuts thin, loose paper cleanly.  After the honing wheel, the edge reflects light and tears the same paper.

So here's an opportunity for someone to write a new chapter for the Wiki/sticky project - if you're a successful Tormek stropper, what's your secret?  One other note, my honing wheel started out way over-oiled and to some degree still is.  Perhaps the leather is just too yielding to work well because of that?
#4
Since joining the Tormek forum, for some odd reason I thought the "General Tormek Questions" sub-forum was the only sub-forum.  I only discovered the other sub-forums in the last couple of days and have enjoyed "catching up" on all the old posts I've missed!

One of the threads that caught my attention was Robin's, regarding the SE-76 and getting a square edge with a variety of different tools.  I had some of the same concerns and thought I'd post a couple of thoughts for anyone who might benefit.

The first and foremost thing you must do IMO, is to check your work often.  If you do this, your eyes will detect any non-squareness while it's still a non-issue and easy to correct.  If you simply chuck the chisel/iron/whatever into the jig and start wailing away until you think you're done, there's a good chance you'll end up with a skewed edge; not because the SE-76 is bad or defective, but because few tools are truly perfectly straight and parallel on the long edges - including high end tools that are advertised to be just that.  It only takes the tiniest bit of wave in the long edge of a tool to cause the edge to be ground out-of-square when using the SE-76.

Does this negate the whole purpose of the SE-76?  Not at all.  You simply need to realize that the manufacturing process of your tools will result in a certain amount of imperfection.  By the way, I've also found new high end tools where the long edges actually were straight and parallel, but the cutting edge was ground skewed from the factory - in which case you want your first grind to appear to be skewed, in order to fix the new blade!

So what's the secret to knowing what you really have?  Because you have to know what you're starting with in order to know if you're progressing in the right direction as you grind.  The secret is a good small square.  It doesn't have to be super expensive, although I can't help but to recommend Starrett for any such tools.  But it does have to be square, and there are a lot of them out there that aren't really even close.  A good square will tell you exactly how to chuck the blade into the jig, where more or less material needs to be removed, where any imperfections in the tool are located, etc.

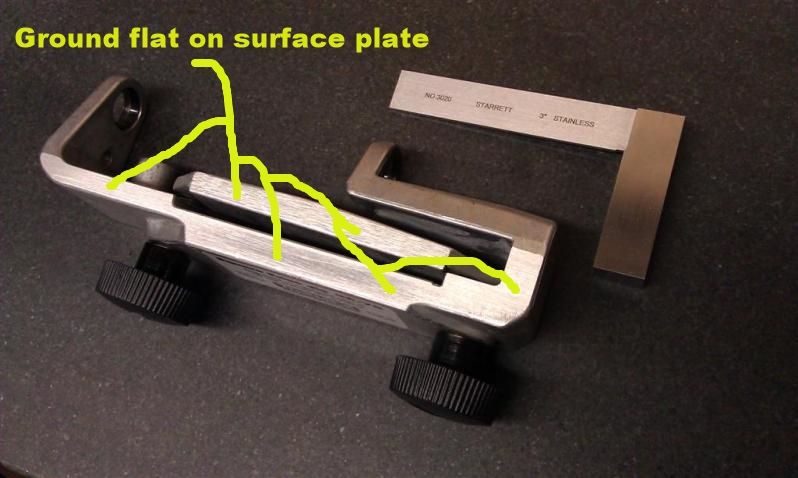
Along with that, I found that a slight improvement can be made to the SE-76 itself.  If you look at the front of the jig, in the area around where the tool projects from it, you'll see that it wasn't intended to serve as a precision surface.  It's kind of rounded, probably has a bit of mold seam, etc.  This is the outside of the jig and isn't meant to register against anything - so there isn't supposed to be a need for it to have a precision surface.  However, I've found that by flattening that entire front face of the jig (using sandpaper on a granite plate), I can use that surface with my square as an additional check for squareness when the blade is mounted in the jig.


In the photo above you can see where I flattened the front of the jig.  When doing that, I checked my progress by registering the square to the inside of the jig and the front of the jig; this effectively told me that I had the front face perfectly square to the blade registration surface.

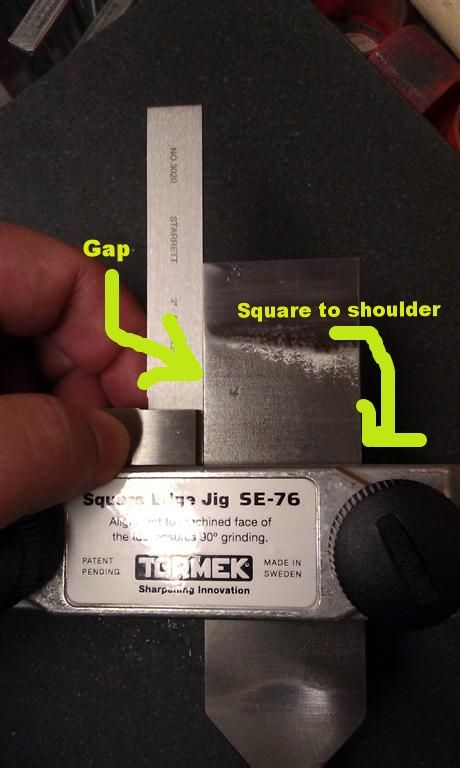
With the front of the jig flattened, it now serves as an additional point from which to check for squareness.  If you look closely, you can see that although this old Stanley 720 chisel is registered into the SE-76, it's not quite perfectly square:


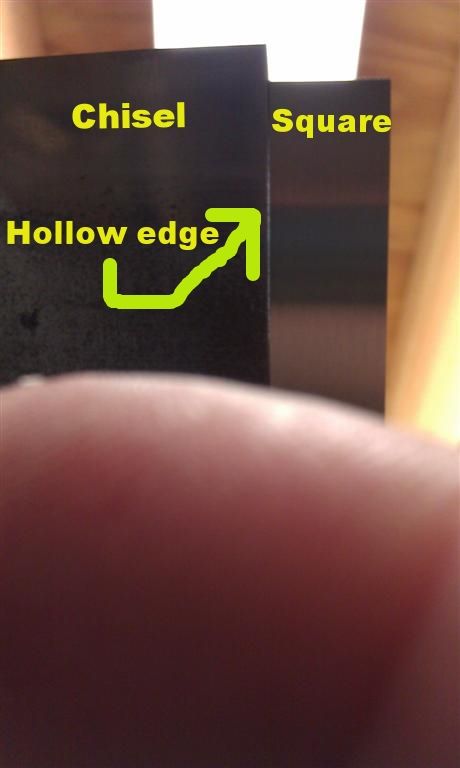
And by holding the square up to the registration edge of the chisel, you can see why.  With a strong light behind, you can see that there's a very slight wave in the edge of the chisel.  That's all it takes to throw off your squareness (in this case I had to slightly adjust the chisel in the jig to account for this):


I'm interested in hearing your thoughts on this, and any other suggestions for grinding square edges.
#5
General Tormek Questions / Axe jig
August 18, 2012, 10:24:25 PM
Just wondering if anyone here has experience with the axe jig?  I've recently developed an interest in axes and have been wondering how good a tool the Tormek is for sharpening these (necessarily) convex-edged tools.
#6
What must a person have to go with his new Swedish Tormek sharpening system?  A pair of hand-made Swedish axes, of course!

These are the Gransfors Bruks Small Forest Axe and Wildlife Hatchet.


These come hair-shaving sharp out of the box, however the hatchet had two small nicks in the edge.  I was hesitant to go after them with the Tormek since I'm still working on getting the hang of hand work on the Tormek (I don't have the axe jig and am not sure that's the best way to go anyway).  But, I steeled myself and went for it very gently and slowly on the fine graded wheel, and couldn't be happier with the results after honing.  I'll probably do most future sharpening of these with a hand stone but we'll see.  By the way, my over-oiled honing wheel is really settling down now and working better than it ever has.

Here's an interesting video for anyone not familiar with the brand:

https://www.youtube.com/watch?v=E89nlVmPeeU
#7
As a new Tormek owner, I made the same mistake quite a few others have made, based on my reading.  I over-oiled the honing wheel - a lot.  Basically, my wheel does virtually nothing to improve an edge now, because it's like trying to hone with velvet.  I've tried soaking the oil out with paper towels, "scraping" it out by running against a blunt edge, etc.  It seems there's no end to the oil coming out and I'm about to declare the wheel hopeless.  Does anyone have any suggestions?
#8
General Tormek Questions / RB-180
May 11, 2012, 09:48:39 AM
Jeff,

Can you provide any details on how the RB-180 is made?  This is something the Tormek has needed for a long time, and this might save me from making one myself - but the only picture I've seen makes it look like cheap plastic.  What's the material?  What is the rotating mechanism?  What keeps it from rotating during grinding?  Any additional insight would be appreciated!
#9
I have the standard stone and am re-profiling my first plane iron - a 2" wide, 3/16" thick, flat-ground blade.  So far I've been grinding away for over an hour and am only about 2/3 through the flat bevel.  I've graded the stone 6-8 times with the coarse side of the grading stone, but the stone still seems glazed.  I know that if I make a pass with the truing jig, the stone will then cut through that bevel in about 20 seconds - but that seems like an extreme thing to have to do, just to do a standard re-profile.  And with the number of chisels and irons I need to do, I'll be replacing the stone in no time at all it seems.

Am I doing something wrong?
#10
General Tormek Questions / Knife sharpening
April 22, 2012, 10:48:21 PM
I have a question about setting the grinding angle when sharpening a knife.  My question would apply regardless of which knife jig is used.

The knife in question is a 7" survival knife similar to the one pictured.  The same question could apply to many types of knives.  Notice that each side of the blade consists of 3 surfaces - 1) the flat, unground surface near the rear edge or spine of the blade, 2) a wide relief grind that essentially turns the whole blade into a wedge, and 3) the actual edge grind (not really visible in this photo, but it is there and its a steeper angle than the relief grind).  When setting the grinding angle using the WM-200, which surface should be referenced?  The actual cutting edge is obviously too narrow to use, but the relief surface is a different (and unknown) angle.  I don't see any predictable, let alone repeatable, way to grind a known angle.