
Imo sandpaper on a soft substrate will work very well to resharpen an already convexed edge or full convex blade, but to get that convex shape in the first place a hard substrate works much better.
- Welcome to Tormek Community Forum.
News:
Welcome to the Tormek Community. If you previously registered for the discussion board but had not made any posts, your membership may have been purged. Secure your membership in this community by joining in the conversations.
www.tormek.com
This section allows you to view all posts made by this member. Note that you can only see posts made in areas you currently have access to.
#2
Knife Sharpening / Re: Buck Strider 881 mini tanto convex regrind
December 02, 2023, 11:56:10 AM
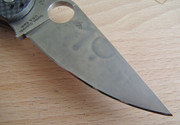
Here the Tormek was used only to grind a new point / slanted edge section on the disassembled blade, using a small knife rest as a guide.
#3
Knife Sharpening / Re: Buck Strider 881 mini tanto convex regrind
December 01, 2023, 01:27:41 PM
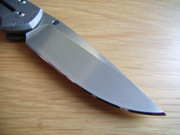
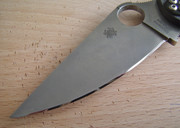
I knew beforehand that the outcome wouldn't be everybody's cup of tea, but for me functionality trumps looks every time.
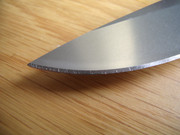
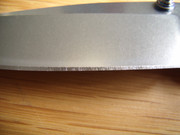
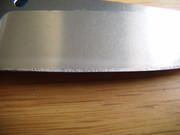
Grinding the rough convex form with the diamond file (without apexing) took a few hours in total.
Most time was spent shaping & smoothing the blade surfaces on the Foss combination stone and the wet & dry paper on glass.
Visually it's still not 100 % perfect, but the current edge already holds up fine whittling an old piece of hard beechwood cutting board.
A few more pics:
#4
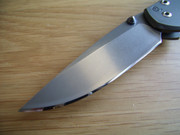
Knife Sharpening / Buck Strider 881 mini tanto convex regrind
December 01, 2023, 01:27:04 PM
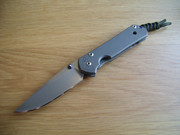
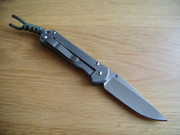
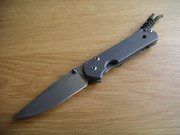
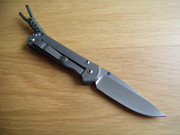
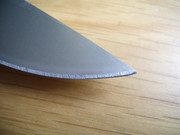
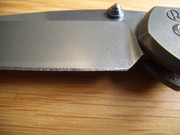
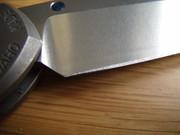
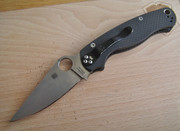
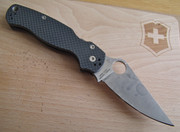
For quite a few years this Buck Strider 881 mini tanto in BG42 steel was gathering dust in a drawer, as to me it was more a knife-like object, literally unable to cut anything.
Over the last few weeks i changed that with the help of my Tormek SB-250 stone (for the point area), a 300 grit diamond file, a Foss 7205 black/green silicon carbide stone, and some 400 grit wet & dry SiC paper on glass (for the straight edge)
The apex on the now full convex blade measures somewhere between 22.5 and 25 degrees inclusive, and i'm first going to do some test cutting to find out if i can safely lower it a bit more.
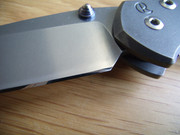
Also rounded the overly sharp G10 grip plates a bit and sanded the screw heads.
Before:


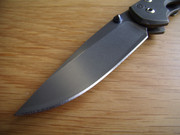
While grinding the blade with the diamond file:


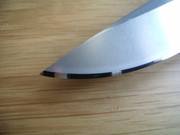
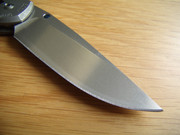
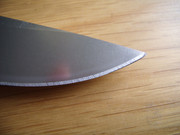
After the 400 grit SiC paper and removing the tiny burr on a piece of hard cardboard with a dab of 1.0 micron diamond paste:


Considering all work was done with only one eye currently functioning at about 80 % (plus a pair of reading glasses) i'm quite pleased with the result, :-)
Over the last few weeks i changed that with the help of my Tormek SB-250 stone (for the point area), a 300 grit diamond file, a Foss 7205 black/green silicon carbide stone, and some 400 grit wet & dry SiC paper on glass (for the straight edge)
The apex on the now full convex blade measures somewhere between 22.5 and 25 degrees inclusive, and i'm first going to do some test cutting to find out if i can safely lower it a bit more.
Also rounded the overly sharp G10 grip plates a bit and sanded the screw heads.
Before:
While grinding the blade with the diamond file:
After the 400 grit SiC paper and removing the tiny burr on a piece of hard cardboard with a dab of 1.0 micron diamond paste:
Considering all work was done with only one eye currently functioning at about 80 % (plus a pair of reading glasses) i'm quite pleased with the result, :-)
#5
Knife Sharpening / Bird & Trout shank
October 15, 2023, 03:28:02 PM
Sometimes i remodel worn out or discarded meat carving knives into very narrow shank-like knives, which i then give away to certain Chefs & butchers.
This old Swibo i did a few years back, and it has quickly become the favorite bird & trout knife of a local Chef.
The rigid blade is hand convex ground up to 400 grit wet & dry SiC, it has an edge angle somewhere between 25 and 30 degrees inclusive, and the back of the blade is also convexed to a degree (which thins the blade a bit more & allows for better twisting & turning)
My Tormek T7 fitted with an SB-250 Blackstone was used in a supportive role; to grind down the back of the blade a bit before i continued with hand convex grinding.
The hard rubber-like handle has no real guard, only a few shallow finger grooves, which provide for quite a lot of grip.
Very useful knife according to it's owner.
#6
General Tormek Questions / Re: For Those Who Use Paper Wheels
June 13, 2023, 09:53:30 PM
Maybe this is useful for other people as well.
I have coated the inside of the holes in my Paper Wheels with a few layers of the same woodglue i use for regritting.
Just put on a layer, spread it evenly with a matchstick or nail and let it dry overnight, repeat if necessary.
Not only does it remove any slop there might be, it also holds the round shape better than just the cardboard, which is especially useful for me since i change Wheels often.
#7
Knife Sharpening / Re: Scandi sharpening
October 07, 2021, 09:23:23 PM
Iirc the limiter block was made around 2014 in an attempt to be able to wet grind somewhat wider bevels like on scandi's better & faster than i was able to do with the standard Tormek knife clamp, while at the same time keeping things reasonably pleasing to the eye and of course repeatable.
Most people in my area that use Mora type knives just want to have their geometry re-established from time to time, so they can then touch up the microbevel quick & easy when on the job.
When i bought this Mora 2000 in Sweden the shop owner told me that most working people use these types of Mora knives until the microbevel turns into a standard width bevel, and then they throw the knife away and buy a new one.
But at least where i live we don't do that,
#8
Knife Sharpening / Re: Scandi sharpening
October 06, 2021, 01:07:02 PM
Specifically for scandi grinds on Mora's etc i designed and had this made a while back.
I call it a "limiter block", as it limits your range of movements while sharpening guided on the Tormek to only back & forth and up & down (for the point area)
The block can slide along the steel guide rod, and with the screws i can finetune the clamping force.
The knife is my Mora 2000 which i bought in Sweden in 2006, and which was used as a testbed for various edges, once even with a few serrations just in front of the handle.
I reground it several years ago using the limiter block, then removed the slight burr on the Tormek leather wheel for a slightly convex microbevel.
It has been living in my daypack ever since, and the apex has already been refreshed several times on a Spyderco white ceramic stick (when on holiday)
#9
General Tormek Questions / Re: Convex Edges
December 24, 2020, 08:43:12 AM
One would need an ovalized stone to do convex edges on a Tormek.
The mock-up in the pics shows how this would work.
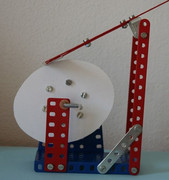
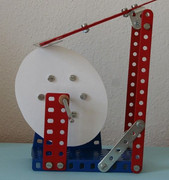
(Pics stolen from forum member Jan)
The mock-up in the pics shows how this would work.
(Pics stolen from forum member Jan)
#10
General Tormek Questions / Re: Just Got A T-4 and a 1x30 Belt Sander, Advice Needed
December 11, 2020, 09:18:51 AM
After reprofiling & sharpening on a Paper Wheel with 15 micron diamond compound, then deburring and polishing it a bit with a second Paper Wheel coated with 1.0 micron diamond compound.
The new edge is a bit convex, and measures ~30 degrees inclusive on the straight part of the edge, changing into ~35 degrees inclusive from belly to point.
This to avoid widening the bevels there too much, as this blade is relatively thick behind the edge in that area.
The last picture shows a small facet at the heel which has an entirely different angle, so i could not remove it without making things worse.
Visually it's not perfect yet treetopping sharp, and the owner was happy.
#11
General Tormek Questions / Re: Just Got A T-4 and a 1x30 Belt Sander, Advice Needed
December 11, 2020, 09:18:23 AM
We're all in the same boat, learning new things everyday, 
Here's an example of how i use daylight coming from the right hand side to compare old and new scratch patterns in edge bevels.
The first owner of this small Sebenza apparently thought it a good idea to use the knife for sharpening practice in his new Wicked Edge.
The outcome made him sell the knife for a measly 150 Euro's to owner number two, who sent it to me with the request to tidy things up a bit and give it a bit of a shiny edge.
Below is what the knife looked like when i received it, still with it's very rough and partly unapexed "edge", and with an edge angle of ~40 degrees inclusive at the straight part of the edge, changing into ~45 degrees inclusive from belly to point.
#12
General Tormek Questions / Re: Just Got A T-4 and a 1x30 Belt Sander, Advice Needed
December 10, 2020, 07:28:27 PM
I'm not quite sure what that area in my own picture number 2 shows, it's either a trick of the light or i didn't polish the entire bevel there.
Whatever it is, that part of the image isn't representative for the bevels & apex which were sharpened on a Paper Wheel with 15 micron diamond compound, then refined through 6, 3, and 1 micron diamond compound on other Paper Wheels.
No Tormek stone that i know of comes close to that level of refinement, but of course it isn't often required or necessary.
Using lighting to catch different scratch patterns in pictures is something i do as well, but from your posts it wasn't clear to me that you were doing the same.
#13
General Tormek Questions / Re: Just Got A T-4 and a 1x30 Belt Sander, Advice Needed
December 06, 2020, 06:40:06 PM
I know what a mirror edge is supposed to look like, it's just that so far i haven't seen one in this thread.
This is a mirror edge on a user Spyderco PM 2 in CPM-M4 steel i did on my Paper Wheels some time ago.
(you can enlarge each picture 2 x for more detail):


This is a mirror edge on a user Spyderco PM 2 in CPM-M4 steel i did on my Paper Wheels some time ago.
(you can enlarge each picture 2 x for more detail):
#14
General Tormek Questions / Re: Just Got A T-4 and a 1x30 Belt Sander, Advice Needed
December 06, 2020, 03:05:06 PM
Why do you call them mirror edges ?
#15
Knife Sharpening / Re: Using 1u Diamond Spray On Leather Honing Wheel
November 18, 2020, 10:33:03 PM
1.0 micron diamond paste on the leather wheel here, and quite a lot of it.
Works like a charm.
Works like a charm.